
ОСНОВНЕ керівництво Gideros Studio
Зміст
6. Playing sound and music
6.1 Introduction to sound system
6.2 Playing a sound
6.3 Using sound channels
6.4 Releasing a sound
6.5 Stopping a sound
6.6 Getting length of a sound file
6.7 Setting and getting the volume of a sound
6.8 Getting the current position of a sound playing
7. Hardware and OS
10.7 Custom events
11. Miscellaneous
11.1 Using UrlLoader
11.1.1 Downloading audio
11.1.2 Downloading images
11.2 Matrix operations
Зміст
6. Playing sound and music
6. Playing sound and music
6.1 Introduction to sound system
The Sound class in Gideros let you play back sound files of all kinds. Be it short sound effects like a gunshot or a 5 minute piece of music, it doesn’t matter. Under the hood, Gideros utilizes OpenAL for playing back WAV files and AVAudioPlayer to play back MP3 files..
The supported file formats are MP3 and WAV on iOS and Android. If you need to convert your sounds files to one of these formats, then try the open source software Audacity[2]. It will help you convert your sound files in no time.
Regarding the performance, you should use .wav files for sound effects and .mp3 for background music. Here are the advantages and disadvantages of these:
-WAV files: Entire sound is loaded into memory. Consumes little CPU while playing. Suitable for simultaneously played sound effects.
-MP3 files: Sound is played by reading small chunks therefore consumes little memory. Consumes more CPU compared to WAV files. Suitable for background music/speech.
According to Atilims tests, playing a single MP3 consumes about %20 of the CPU on and iPod Touch 2nd Gen.
6.2 Playing a sound
Here is a sample to play a sound inside your app. It uses the play method of the Sound class:
-- Load a new sound and assign it to a variable
local yourSound = Sound.new("yourSoundFile.mp3")
-- Now play the sound
yourSound:play()
As you can see, it is very easy to play a sound effect or a music file. The play method of the Sound class has two optional parameters:
- startTime (number, default = 0)
- loop (number, default = 0)
With the startTime, you can control the starting point in miliseconds, from where a sound is played back. The loop parameter will control if the sound will played repeatly for the given number of times. Here is a sample example that will play a sound starting from 200 miliseconds and repeat itself 5 times:
yourSound:play(200, 5)
If you want to let a sound play repeatedly, then just set the loop value to math.huge:
yourSound:play(0, math.huge)
6.3 Using sound channels
Playing back sounds inside your app is nice but sometimes you want to have a little bit more control over things. And for this Gideros uses sound channels. How are the created or retrieved you might ask? Piece of cake! Whenever you play a sound, assign the returning value (the sound channel) to a variable. Like this:
local yourChannel = yourSound:play()
There is one event that will tell you when a sound channel has finished playing a sound file:
Event.COMPLETE
Next is a small example on how the Event.COMPLETE event can be used:
-- Load a music file
local snd = Sound.new("DST-Psykick.mp3")
-- Start playing the musc file and store the channel
local chan = snd:play()
-- Define the Event.COMPLETE function that is called
-- when the sound finishes playing
function onSoundComplete(event)
print ("Sound complete")
end
-- Add the event listener that is firing when the sound
-- finishes playing
chan:addEventListener(Event.COMPLETE,onSoundComplete)
6.4 Releasing a sound
You don’t have to release a sound manually. It will be collected once the app ends. But if you need to release a sound during the life of your app, then just set the corresponding channel to nil:
yourSound = nil
Attention: If the sound is currently playing, the sound will be released after it finishes playing.
6.5 Stopping a sound
If you want to stop a playing sound, then use your sound channel and its stop method for it:
sndChannel:stop()
6.6 Getting length of a sound file
Sometimes you need to know how long a sound file is exactly. To determine the length of a sound file you can use the getLength method. Use it with your sound channel:
local sndLength = sndChannel:getLength()
After this line is executed, sndLength will hold the length of the sound in milliseconds.
6.7 Setting and getting the volume of a sound
Before you break some ears with loud sounds, you better give your users the possibility to control the volume of the sounds your app is playing. For this there are two methods, setVolume and getVolume.
To get the volume of a sound, try this:
local volume = sndChannel:getVolume()
And to set the volume of a channel, use setVolume like this:
sndChannel:setVolume(0.5)
The volume levels ranging from 0.0 to 1.0. The later means maximum volume.
6.8 Getting the current position of a sound playing
When you need to pause a sound or display the current position of a sound playing, you need to determine the current position of a channel. For this use the getPosition method with your channel:
local currSndPos = sndChannel:getPosition()
The position is determined in milliseconds. So if you need to pause a sound, retrieve the current position, stop the sound channel and when you resume your sound, use the stored position as a start time for the play method.
7. Hardware and OS
7.1 Introduction to hardware system
7.2 Getting logical dimensions
7.3 Getting device dimensions
7.4 Getting system information
7.5 Getting and setting orientation
7.6 Localization and language
7.7 Handling touch and mouse input
Note: The easiest way to detect if the player touches the screen with two fingers, is to control the length of event.allTouches array. If it is 2, then exactly 2 fingers is touching the screen.
local function onTouchesBegin(event)
local isTwoFinger = (#event.allTouches == 2)
end
7.8 Multitouch
7.9 Gyroscope
7.10 Accelerometer
7.11 GPS and location
7.12 Vibration
Some of the video game consoles have vibration feature in their joysticks or gamepads. This tactile feedback brings realism and fun inside the game, and provides an engagement mechanism for the game developer. In your game, sometimes you may want to vibrate the device, and Gideros Studio provides a function for this. Consider the following example:
application:vibrate()
The vibration period is 300 ms for Android. For iOS, device vibrates for a duration which is determined by the operating system. Vibration will not work on the iPodTouch or the iPad devices as of this writing, and the command above is simply ignored.
7.13 Disabling screen dimming
Some games may require that player doesn't touch the screen for a long time, e.g those using accelerometer and gyro to control the actors on the screen. In this case, the screen may dim, depending on the user's activity and device settings. To disable (or enable) screen dimming, use the following commands:
-- disable screen dimming and device sleeping
application:setKeepAwake(true)
-- enable screen dimming and device sleeping
application:setKeepAwake(false)
Note that this function has no effect on desktop player.
7.14 Filesystem
In Gideros runtime, there are 3 kinds of directories: resource, document, and temporary.
7.14.1 Resource directory
Your code, image, audio and all other files are reside at resource directory. Consider the test project below, and examine the 3 directories and corresponding files.
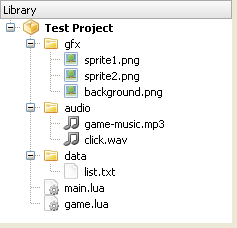
The files seen above are stored on a real device and Gideros Player like the following:
{resource directory}/gfx/sprite1.png
{resource directory}/gfx/sprite2.png
{resource directory}/gfx/background.png
{resource directory}/audio/game-music.mp3
{resource directory}/audio/click.wav
{resource directory}/data/list.txt
{resource directory}/main.lua
{resource directory}/game.lua
Resource directory is the default directory. Therefore, to access the files at resource directory, specify the file path as it is:
local sprite1 = Texture.new("gfx/sprite1.png")
local sprite2 = Texture.new("gfx/sprite2.png")
local background = Texture.new("gfx/background.png")
local music = Sound.new("audio/game-music.mp3")
local click = Sound.new("audio/click.wav")
Also, you can use the io library provided by Lua:
io.read("data/list.txt")
You don't need to know the exact path of resource, document and temporary directories because Gideros Studio provides an easy way to specify files at these directories.
7.14.2 Document directory
You can store a file created by your application in "document" directory. The files created in this directory is permanent among application sessions. For example, you can create and then read files at document directory to save player progress, or keep latest GPS coordinates.
In order to specify a file in document directory, append "|D|" to the beginning of the filename:
io.write("|D|save.txt")
7.14.3 Temporary directory
Gideros Studio provides a temporary directory to store files that may not stay permanent between different sessions. Therefore, files created in this directory are not guaranteed to exist when applications runs next time, and may be deleted after application session finishes.
In order to specify a file at temporary directory, append "|T|" to the begining of the file name. Consider the example below:
io.write("|T|temp.txt")
Note: Optionally, you can access the files at resource directory by adding "|R|" to the beginning of the file name (but you don't need to):
local sprite1 = Texture.new("|R|gfx/sprite1.png")
To sum up, here's a list of file operations on the device:
-- open file.txt at resource directory to read
io.read("file.txt")
-- open file.txt at resource directory to read (same as above)
io.read("|R|file.txt")
-- open file.txt at documents directory to read
io.read("|D|file.txt")
-- open file.txt at temporary directory to read
io.read("|T|file.txt")
7.14.4 File execution order
8. Extend your application with plugins
8.1 Introduction to Plugins
Using plugins written in the native language of the iOS or Android device, you can extend Gideros to use all the native features of the device.
There is an example iOS plugin included with Gideros Studio for Game Kit. This means that your Gideros application can fully use Apple’s GameCenter.
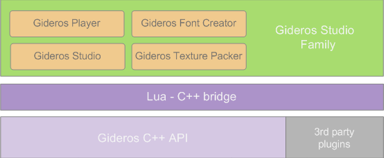
Referring back to the architecture described in chapter 1.5, this chapter will deal with the top three layers.
Gideros Studio <--------> Lua - C++ bridge <--------> 3rd party plugins
8.2 The Lua - C++ bridge API
Lua provides a full C API interface, which allows communication between Gideros Studio and your plugin. Gideros Studio and your plugin exchange data through a stack.
Data is pushed onto the stack, and popped off the stack. In this example, an integer has just been pushed onto the stack, and is at the top of the stack.
4
|
integer
|
-1
|
3
|
table
|
-2
|
2
|
function
|
-3
|
1
|
“string”
|
-4
|
The Lua Stack
Notice the numbering - on the left is the position in the stack, 1 being the deepest. On the right is the relative numbering from the top, -1 being the top, and -4 here being the deepest.
8.2.1 A pseudo-code example
This all takes place in the C API plugin code.
Push “fred” onto an empty stack
|
1
|
“fred”
|
-1
|
Push a function onto the stack
|
2
|
function
|
-1
|
1
|
“fred”
|
-2
|
Push a new table onto the stack
|
3
|
table (empty)
|
-1
|
2
|
function
|
-2
| |
1
|
“fred”
|
-3
|
Push an integer onto the stack
|
4
|
integer
|
-1
|
3
|
table (empty)
|
-2
| |
2
|
function
|
-3
| |
1
|
“fred”
|
-4
|
Move the integer into the table
|
3
|
table (contains integer)
|
-1
|
2
|
function
|
-2
| |
1
|
“fred”
|
-3
|
Pop 1 off the stack
|
2
|
function
|
-1
|
1
|
“fred”
|
-2
|
Pop 2 off the stack
|
8.3 A first plugin for the iPhone
Gideros Studio will send the plugin two integers, which a C function will add together and return the result to Gideros Studio.
- In Xcode, open the GiderosiPhonePlayer project and create an empty file called myFirstPlugin.mm.
- Copy in the plugin code below.
- Connect the iPhone, and build and run the GiderosiPhonePlayer app on the phone. The FPS is printed on the debug console every second.
- Create a new project in Gideros Studio
- In Gideros Studio, under Player Menu > Player Settings, untick Localhost, and enter the IP address on your iPhone (wireless connection is needed here for Gideros Studio). The IP address should look something like 192.168.x.xxx.
- Copy in the Gideros Studio code below.
- Run the program in Gideros Studio.
You should have both the debug console open in Xcode, and the Output console in Gideros Studio. Messages from the plugin will be printed in the Xcode console, and messages from Lua will be printed in the Gideros Studio console.
8.3.1 Plugin code
Create an empty file called myFirstPlugin.mm in the GiderosiPhonePlayer Xcode project, and copy the following code into it. This is the minimum code that is necessary for a C plugin.
#include "gideros.h"
#include "lua.h"
#include "lauxlib.h"
static int addTwoIntegers(lua_State *L)
{
//retrieve the two integers from the stack
int firstInteger = lua_tointeger(L, -1);
int secondInteger = lua_tointeger(L, -2);
int result = firstInteger + secondInteger;
//place the result on the stack
lua_pushinteger(L, result);
//one item off the top of the stack, the result, is returned
return 1;
}
static int loader(lua_State *L)
{
//This is a list of functions that can be called from Lua
const luaL_Reg functionlist[] = {
{"addTwoIntegers", addTwoIntegers},
{NULL, NULL},
};
luaL_register(L, "myFirstPlugin", functionlist);
//return the pointer to the plugin
return 1;
}
static void g_initializePlugin(lua_State* L)
{
lua_getglobal(L, "package");
lua_getfield(L, -1, "preload");
lua_pushcfunction(L, loader);
lua_setfield(L, -2, "myFirst");
lua_pop(L, 2);
}
static void g_deinitializePlugin(lua_State *L)
{ }
REGISTER_PLUGIN("myFirstPlugin", "1.0")
8.3.2 Gideros Studio code
Create a new Gideros Studio project, and then a main.lua file containing the following code. This is the minimum code that will interface with the C plugin.
require "myFirst"
--Send two integers to be added together and return an integer result
local result = myFirstPlugin.addTwoIntegers(14, 48)
print("\n\nSample 1 - Result of addTwoIntegers:", result, "\n\n")
8.3.3 Explanation of the code
require "myFirst"
This Lua code calls the g_initializePlugin() function, which tells the Gideros API to initialize and call the loader() function.
The loader() function tells the Gideros API which plugin functions are available to be called from Lua. When you create a new function to be called from Lua, add that function to
the functionList[] in loader(). If you get the message "attempt to call method xxx (a nil value)", then you have probably forgotten to add the function to the list.
local result = myFirstPlugin.addTwoIntegers(14, 48)
This Lua code will call the plugin function addTwoIntegers().
Plugin functions are always declared:
static int function_name(lua_State *L) { return noOfArguments;}
noOfArguments is the number of arguments held on the stack to return to Gideros Studio.
Declare the plugin function:
static int addTwoIntegers(lua_State *L)
{
lua_State *L holds all the information of the Lua interpreter, and must be passed as the first argument.
int firstInteger = lua_tointeger(L, -1);
int secondInteger = lua_tointeger(L, -2);
int result = firstInteger + secondInteger;
The two integers sent from Gideros Studio - 14 and 48 - are on the top of the stack. 48 is the top position (-1) and 14 is the second position (-2).
lua_tointeger(lua_State *L, int index) is one of the Lua C API functions that retrieves data from the Lua stack.
//place the result on the stack
lua_pushinteger(L, result);
lua_pushinteger(lua_State *L, int i) places the result back onto the stack in the top position.
//one item off the top of the stack, the result, is returned
return 1;
The number of arguments to be retrieved off the top of the stack are returned to Gideros Studio. As the result is the topmost position on the stack, this is the one that Gideros Studio will retrieve.
8.4 Exchanging Data
The most common Lua C API functions will be described below. For a complete listing of all the functions in the Lua C API, visit the Lua manual at:
8.4.1 Send data to the plugin
In the addTwoIntegers example above, two integers are sent to the plugin, and the plugin extracts them off the stack using:
lua_tointeger(L, -1);
Other types of data can be extracted using the other lua_totypes:
lua_tonumber(L, -1);
lua_toboolean(L, -1);
lua_tostring(L, -1);
8.4.2 Return data to Gideros Studio
When the plugin function is complete, the function will return to Gideros Studio with a number of arguments:
return 2;
This will return two values off the top of the stack. To get data onto the stack, use one of the lua_pushtype functions:
lua_pushstring(L, “this is a string”);
lua_pushinteger(L, result);
lua_pushboolean(L, isCorrect);
lua_pushnumber(L, afloat);
8.4.3 Tables
To be used in the C plugin, Lua tables have to be converted to a C type, such as an array or an NSArray or an NSDictionary.
To traverse a table on the top of the stack:
//push nil onto the stack so that the while loop will work
lua_pushnil(L);
//==2 nil -1==
//==1 tableWithKeys -2==
while (lua_next(L, 1) != 0) {
//lua_next pops the key off the stack
//then pushes the next key and value onto the stack
//==3 value - table value -1==
//==2 key - key -2==
//==1 tableWithKeys -3==
//use a function like lua_tonumber to retrieve the value
//off the top of the stack
// remove value - key stays for lua_next
lua_pop(L, 1);
//==2 key - key -1==
//==1 tableWithKeys -2==
}
It is a good idea to keep track of the stack in comments, as in the example above, so that you can easily see what is happening in your code.
8.4.4 Example - Sort a Gideros Studio table array
This example sends an array of strings from Gideros Studio to the plugin. The plugin reads the table, and places the array into an Objective C NSMutableArray. It is then sorted and returned to Gideros Studio.
Plugin Code
Remember to add the name of the function to the function list in loader() as described above.
static int sortTable(lua_State *L)
{
//==1 tableToBeSorted -1==
//push nil onto the stack so that the while loop will work
lua_pushnil(L);
//==2 nil -1==
//==1 tableToBeSorted -2==
NSMutableArray *array = [NSMutableArray array];
//move the table into an NSMutableArray
while (lua_next(L, 1) != 0) {
//==3 value - sort this string -1==
//==2 key - in an array, this is the index number -2==
//==1 tableToBeSorted -3==
NSString *value = [NSString stringWithUTF8String:luaL_checkstring(L, -1)];
[array addObject:value];
// remove value - key stays for lua_next
lua_pop(L, 1);
}
//pop the table off the stack, as we don't need it any more
lua_pop(L, 1);
//sort the array
[array sortUsingSelector:@selector(compare:)];
//Create a new table
lua_newtable(L);
//==1 newtable -1==
//Lua tables start from 1, whereas C arrays start from 0
int index = 1;
for (NSString *string in array) {
//push the table index
lua_pushnumber(L, index++);
//push the string on the stack, converting it to a const char*
lua_pushstring(L, [string UTF8String]);
//==3 "animal string" -1==
//==2 index number -2==
//==1 newtable -3==
//store index and string value into the table
lua_rawset(L, -3);
//==1 newtable -1==
}
//return the sorted table on the stack to Gideros Studio
return 1;
}
Gideros Studio code
require “pluginName”
local sortedResult = pluginName.sortTable({"giraffe", "antelope", "aardvark", "zebra", "badger"})
for i = 1, #sortedResult do
print("\t\t", sortedResult[i])
end
8.5 Communication from the plugin to Gideros Studio
Communication from the plugin to Gideros Studio can be achieved by direct calling of a Gideros Studio function in the plugin, and also by dispatching events, which a Gideros Studio listener will pick up.
8.5.1 Call a Gideros Studio function from the plugin
This example will define two functions in Gideros Studio - printName() and eventHappened(). The C plugin will call these two functions.
Gideros Studio Code:
local function printName(name)
print("\n\t\tFunction called from plugin")
print("\t\t", "Name:", name)
end
local function eventHappened(event, x, y)
print("\n\t\tFunction called from plugin")
print("\t\t", "Event:", event, "X:", x, "Y:", y)
end
print("\nSample 7 - Call functions from plugin:")
pluginName.doCallback(printName, "Caroline", 1)
pluginName.doCallback(eventHappened, "Touched", 52, 243, 3)
Plugin code:
The function doCallback() accepts the function name to be called, then the arguments for that function, and then the number of arguments sent.
static int doCallback(lua_State *L)
{
//==4 no of arguments -1==
//==3 argument -2==
//==2 argument -3==
//==1 function -4==
int noOfArguments = lua_tointeger(L, -1);
//remove no of arguments off the stack
lua_pop(L, 1);
//call the function.
//noOfArguments tells the Lua C API how many arguments are
//on the stack.
//the function is on the stack below all the arguments
lua_call(L, noOfArguments, 0);
return 0;
}
8.5.2 Retain data in the Lua Registry
To be able to retain information, the Lua C API provides a registry. This behaves like the stack, but has a special index called LUA_REGISTRYINDEX. You can create tables and push them into the registry by
lua_rawset(L, LUA_REGISTRYINDEX)
Because the registry is common over all available plugins, the usual way of creating a unique key for a registry table is to use the address of a variable.
This example saves data into a KEY_OBJECTS table that has been previously created in the registry.
static const char KEY_OBJECTS = ' ';
lua_pushlightuserdata(L, (void *)&KEY_OBJECTS);
//== 1 address of KEY_OBJECTS -1==
lua_rawget(L, LUA_REGISTRYINDEX);
//== 1 table of KEY_OBJECTS -1==
lua_pushstring(L, “value”);
//== 2 “value” -1==
//== 1 table of KEY_OBJECTS -2==
//”value” goes into KEY_OBJECTS at index 1
lua_rawseti(L, -2, 1);
//== 1 table of KEY_OBJECTS -1==
Retrieving this data - "value" will be placed at the top of the stack for further use:
lua_pushlightuserdata(L, (void *)&KEY_OBJECTS);
//== 1 address of KEY_OBJECTS -1==
lua_rawget(L, LUA_REGISTRYINDEX);
//== 1 table of KEY_OBJECTS -1==
//retrieve index 1 in the KEY_OBJECTS table
lua_rawgeti(L, -2, 1);
//== 2 “value” -1==
//== 1 table of KEY_OBJECTS -2==
8.5.3 Dispatch events to Gideros Studio
Events and listeners are one of the core features of Gideros Studio. To set up the C API to dispatch events, you need to create a sub-class of GEventDispatcherProxy. This class will be retained in the Lua registry as described above.
The following example will build a ProgressBar class, which will accept an integer from Gideros Studio, add it to a total held in the ProgressBar class, and when the total reaches 100, will dispatch an event to Gideros Studio.
This loader function will:
1. Create an Event Dispatcher class
2. Define an event and save it in the Lua global Event table
3. Create a table in the Lua registry to retain variables
4. Instantiate the Event Dispatcher class
5. Retain the Event Dispatcher class instance in the registry table
static int loader(lua_State *L)
{
//list the functions available to Gideros Studio
const luaL_Reg functionlist[] = {
{"addToProgress", addToProgress},
{NULL, NULL},
};
// 1. Create an Event Dispatcher class, defining optional
//create and destruct methods
g_createClass(L, "ProgressBar", "EventDispatcher", NULL, destruct, functionlist);
// 2. Define an event and save it in the Lua global Event table
lua_getglobal(L, "Event");
lua_pushstring(L, "progressComplete");
lua_setfield(L, -2, "progressComplete");
lua_pop(L, 1);
// 3. create a weak table in LUA_REGISTRYINDEX that can be accessed with the address of KEY_OBJECTS
lua_pushlightuserdata(L, (void *)&KEY_OBJECTS);
lua_newtable(L); // create a table
lua_pushliteral(L, "v");
lua_setfield(L, -2, "__mode"); // set as weak-value table
lua_pushvalue(L, -1); // duplicate table
lua_setmetatable(L, -2); // set itself as metatable
lua_rawset(L, LUA_REGISTRYINDEX);
// 4. Instantiate the Event Dispatcher class
ProgressBar *bar = new ProgressBar(L);
g_pushInstance(L, "ProgressBar", bar->object());
// 5. Retain the Event Dispatcher class instance in the registry table
lua_pushlightuserdata(L, (void *)&KEY_OBJECTS);
lua_rawget(L, LUA_REGISTRYINDEX);
lua_pushvalue(L, -2);
lua_rawseti(L, -2, 1);
lua_pop(L, 1);
lua_pushvalue(L, -1);
lua_setglobal(L, "progress");
//return the pointer to the plugin
return 1;
}
The addToProgress function, listed in the plugin’s function list, simply receives an integer from Gideros Studio and adds it to the ProgressBar’s totalProgress variable:
static int addToProgress(lua_State *L)
{
//how to access an internal instance - see below
GReferenced* object = static_cast(g_getInstance(L, "ProgressBar", 1));
ProgressBar* bar = static_cast(object->proxy());
int progress = lua_tointeger(L, -1);
bar->totalProgress += progress;
//remove the received integer off the stack
lua_pop(L, 1);
//check to see if totalProgress is greater than 100
//if it is, dispatch an event to Gideros Studio.
bar->checkProgress(L);
return 0;
}
The loader function creates a ProgressBar class, which inherits from the Gideros class GEventDispatcherProxy. Proxies are the abstract classes for implementing new types of Gideros objects. Each proxy class owns an instance of an internal class. For example, when you create a GEventDispatcherProxy instance:
GEventDispatcherProxy* eventDispatcherProxy = new GEventDispatcherProxy();
you can access the internal instance by using the object() function:
GReferenced* eventDispatcher = eventDispatcherProxy->object();
Or, if you have a internal object pointer, you can access the proxy object like:
GReferenced proxy = eventDispatcher->proxy();
Functions like g_pushInstance(), g_getInstance() or destruct() work with internal object pointers. To place an object on the stack:
g_pushInstance(L, "GameKit", gamekit->object());
Or to retrieve:
GReferenced* object = static_cast(g_getInstance(L, "GameKit", index));
GameKit* gamekit = static_cast(object->proxy());
Similarly, in the destruct function, you first get the internal object pointer and then get the proxy pointer from it:
void* ptr = *(void**)lua_touserdata(L, 1);
GReferenced* object = static_cast(ptr);
GameKit* gamekit = static_cast(object->proxy());
The ProgressBar class holds a totalProgress variable, and has two methods
checkProgress, to see if totalProgress is greater than 100
dispatchEvent, which dispatches the event to Gideros Studio:
class ProgressBar : public GEventDispatcherProxy
{
public:
int totalProgress;
ProgressBar(lua_State* L) : L(L)
{
totalProgress = 0;
}
ProgressBar()
{ }
void dispatchEvent(const char* type,
NSError* error,
NSString *returnMessage)
{
//== Stack contents
//==1 plugin details -1==
lua_pushlightuserdata(L, (void *)&KEY_OBJECTS);
lua_rawget(L, LUA_REGISTRYINDEX);
lua_rawgeti(L, -1, 1);
//==3 Registry table -1==
//==2 Key Objects table -2==
//==1 plugin details -3==
if (!lua_isnil(L, -1))
{
//get the function name from the Registry
//for dispatchEvent
lua_getfield(L, -1, "dispatchEvent");
//==4 function for dispatchEvent -1==
//==3 Registry table -2==
//==2 Key Objects table -3==
//==1 plugin details -4==
//copy the Registry table to the top of the stack
lua_pushvalue(L, -2);
//==5 Registry table -1==
//==4 function for dispatchEvent -2==
//==etc
//get the event strings for "Event"
//these were set up in loader()
//"Event" currently only contains “progressComplete”
lua_getglobal(L, "Event");
//==6 Event table -1==
//==5 Registry table -2==
//==4 function for dispatchEvent -3==
//==etc
//get the Event function associated with the string "new"
lua_getfield(L, -1, "new");
//==7 function -1==
//etc
//remove the Event table
lua_remove(L, -2);
//==6 function -1==
//==5 Registry table -2==
//==4 function for dispatchEvent -3==
//==3 etc
//push the event type ("progressComplete" in this example)
lua_pushstring(L, type);
//==7 "progressComplete" -1==
//==6 function -2==
//==5 Registry table -3==
//==4 etc
//call the "new" event function
//with "progressComplete" as the argument
//One return value is placed on the stack
lua_call(L, 1, 1);
//==6 table returned from "new" -1==
//==5 Registry table -2==
//==4 function for dispatchEvent -3==
//==etc
if (error)
{
lua_pushinteger(L, error.code);
lua_setfield(L, -2, "errorCode");
lua_pushstring(L, [error.localizedDescription UTF8String]);
lua_setfield(L, -2, "errorDescription"); }
if (returnMessage)
{
//any arguments are pushed into the table
//returned from "new"
//this table will be sent to the Lua Event function
lua_pushstring(L, [returnMessage UTF8String]);
lua_setfield(L, -2, "stringReturned");
}
//two tables are sent to the
//dispatch event function
if (lua_pcall(L, 2, 0, 0) != 0)
{
g_error(L, lua_tostring(L, -1));
return;
}
}
lua_pop(L, 2);
}
void checkProgress(lua_State *L) {
if (totalProgress >= 100) {
dispatchEvent("progressComplete", NULL, @"Progress Complete");
}
}
private:
lua_State* L;
};
When the ProgressBar was first declared to Gideros:
g_createClass(L, "ProgressBar", "EventDispatcher", NULL, destruct, functionlist);
destruct() was the function listed to be called to clean up the memory. (NULL in that example could have been a function to be called when creating the class):
static int destruct(lua_State* L)
{
//get the internal object pointer
void *ptr = *(void**)lua_touserdata(L, 1);
//get the proxy pointer
GReferenced *object = static_cast(ptr);
ProgressBar *bar = static_cast(object->proxy());
bar->unref();
return 0;
}
The Gideros Studio code to use this plugin is simple:
require "progress"
--this function will be called when the
--"progressComplete" event is dispatched
function onProgressComplete(event)
print("Progress Complete")
end
progress:addEventListener("progressComplete", onProgressComplete)
--totalProgress will be 10
progress:addToProgress(10)
--totalProgress will be 30
--this is an equivalent way of calling the plugin function
ProgressBar.addToProgress(progress, 20)
--totalProgress will be greater than 100, and an event will be
--dispatched, calling onProgressComplete
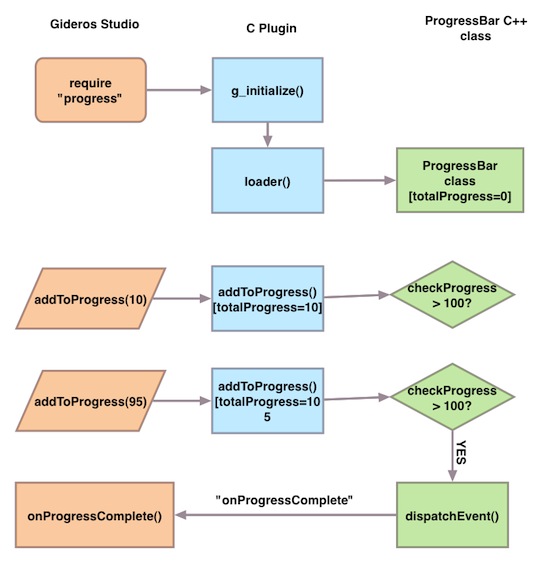
progress:addToProgress(94)
This flowchart summarizes the flow of control between Gideros Studio, the C plugin and the ProgressBar C++ class for data exchange and event dispatching:
9. Real world physics engine
10. Event system
10.1 Introduction to events
Events are the central mechanism to handle responses and they allow to create interactive applications. All classes that dispatch events inherit from EventDispatcher. The target of an event is a listener function and an optional data value. When an event is dispatched, the registered function is called. If the optional data value is given, it is used as a first parameter while calling the listener function.
In Gideros, events can be divided into two categories: built-in events which are generated by the system (e.g. ENTER_FRAME event, touch events, timer events, etc.) and custom events which can be generated by the user. According to their event type, built-in events can be broadcasted to multiple targets (e.g. ENTER_FRAME event, touch events, etc.) or can be dispatched to a single target (e.g. timer event).
10.2 ENTER_FRAME Event
The Gideros runtime dispatches the built-in Event.ENTER_FRAME event to Sprite instances before rendering the screen. Visual changes made by anyEvent.ENTER_FRAME listener function will be visible at next frame.
This first basic example shows a moving sprite one pixel to the right at each frame. In this example, onEnterFrame function increases the x-coordinate of a sprite object at each frame:
local sprite = Sprite.new()
local function onEnterFrame(event)
sprite:setX(sprite:getX() + 1)
end
sprite:addEventListener(Event.ENTER_FRAME, onEnterFrame)
local function onEnterFrame(event)
sprite:setX(sprite:getX() + 1)
end
sprite:addEventListener(Event.ENTER_FRAME, onEnterFrame)
The next example shows 3 independent sprites moving one pixel to the right at each frame. In this example, we use the optional data parameter to move independent sprites with one common listener function:
local sprite1 = Sprite.new()
local sprite2 = Sprite.new()
local sprite3 = Sprite.new()
local function onEnterFrame(self, event)
self:setX(self:getX() + 1)
end
sprite1:addEventListener(Event.ENTER_FRAME, onEnterFrame, sprite1)
sprite2:addEventListener(Event.ENTER_FRAME, onEnterFrame, sprite2)
sprite3:addEventListener(Event.ENTER_FRAME, onEnterFrame, sprite3)
The last example shows subclassing of the Sprite class and registering Event.ENTER_FRAME:
MySprite = gideros.class(Sprite)
function MySprite:init()
self:addEventListener(Event.ENTER_FRAME, self.onEnterFrame, self)
end
function MySprite:onEnterFrame(event)
self:setX(self:getX() + 1)
end
function MySprite:init()
self:addEventListener(Event.ENTER_FRAME, self.onEnterFrame, self)
end
function MySprite:onEnterFrame(event)
self:setX(self:getX() + 1)
end
Note: Event.ENTER_FRAME event is dispatched to all Sprite instances no matter these instances are on the scene tree or not.
Note: When the ENTER_FRAME event dispatches, the event object contains time and deltaTime. Consider the following example:
local function onEnterFrame(event)
print(event.time, event.deltaTime)
end
stage:addEventListener(Event.ENTER_FRAME, onEnterFrame)
10.3 Mouse and touch events
Gideros runtime dispatches mouse and touch events when the the user’s finger touches the screen. Mouse events are mainly used in single-touch whereas touch events are used in multi-touch applications.
The mouse and touch events are dispatched to Sprite instances which are on the scene tree. If a Sprite instance is not on the scene tree, this instance doesn’t receive mouse and touch events.
Note: Even if touch or mouse doesn’t hit the Sprite instance, the instance receives mouse/touch events.
|
The order of dispatch is determined by the hierachy of the scene tree. The Sprite instance that is drawn last (top-most sprite) receives the event first. The next sprite at the bottom of the top-most sprite receives the event second and so on. For example, assume that we have an sprite hierachy like this:
which is constructed by the code below:
local A = Sprite.new()
local B = Sprite.new()
local C = Sprite.new()
local D = Sprite.new()
local E = Sprite.new()
local F = Sprite.new()
A:addChild(B)
A:addChild(C)
B:addChild(D)
B:addChild(E)
C:addChild(F)
local B = Sprite.new()
local C = Sprite.new()
local D = Sprite.new()
local E = Sprite.new()
local F = Sprite.new()
A:addChild(B)
A:addChild(C)
B:addChild(D)
B:addChild(E)
C:addChild(F)
In this hiearchy, the drawing order is A, B, C, D, E, F while mouse/touch event receive order is F, E, D, C, B, A.
10.4 Stopping an event dispatch
It is possible to stop the propagation of mouse and touch events. To stop an event dispatch, invoke the Event:stopPropagation() function on the Eventobject passed to the listener function. In this example below, MOUSE_DOWN event is dispatched only to F, E, D and C:
local A = Sprite.new()
local B = Sprite.new()
local C = Sprite.new()
local D = Sprite.new()
local E = Sprite.new()
local F = Sprite.new()
-- stop propagation at sprite C
C:addEventListener(Event.MOUSE_DOWN, function(event) event:stopPropagation() end)
A:addChild(B)
A:addChild(C)
B:addChild(D)
B:addChild(E)
C:addChild(F)
local B = Sprite.new()
local C = Sprite.new()
local D = Sprite.new()
local E = Sprite.new()
local F = Sprite.new()
-- stop propagation at sprite C
C:addEventListener(Event.MOUSE_DOWN, function(event) event:stopPropagation() end)
A:addChild(B)
A:addChild(C)
B:addChild(D)
B:addChild(E)
C:addChild(F)
Note: stopPropagation is only for mouse and touch events. Because only for them there is a definite dispatching order (the display object on top receives the event first).
10.5 Timer events
The Timer class is used for executing code at specified time intervals. Each Timer object dispatches Event.TIMER event at specified frequency.
The steps to use Timer class are as follows:
1. Create a new Timer object with specified frequency and specified total number of Event.TIMER events to be triggered. For example, the following code sets the frequency to 1000 miliseconds and sets the count to 5.
local timer = Timer.new(1000, 5)
2. Register to the Event.TIMER event with a listener function:
local function onTimer(event)
-- will be executed 5 times at 1000 milliseconds intervals
end
timer:addEventListener(Event.TIMER, onTimer)
3. Start the timer.
timer:start()
4. To stop the timer, you can use Timer:stop() function:
timer:stop()
Event.TIMER_COMPLETE event is triggered after finishing the specified number of timer events.
local function onTimerComplete(event)
-- will be executed after the specified
-- number of timer events (5) are dispatched
end
timer:addEventListener(Event.TIMER_COMPLETE, onTimerComplete)
Also, it is possible to pause and resume all the timers in your application. It is very useful when you are implementing a pause/resume functionality in your game:
-- pause all timers.
-- if all timers are alredy paused, does nothing.
Timer.pauseAllTimers()
Timer.pauseAllTimers()
-- resume all timers. if all timers
-- are alredy running, does nothing.
Timer.resumeAllTimers()
10.6 ADDED_TO_STAGE and REMOVED_FROM_STAGE Events
If a sprite is added to the scene tree, the sprite instance and all of it’s descendants receive Event.ADDED_TO_STAGE event. Similarly, if a sprite is removed from the scene tree, the sprite instance and all of it’s descendants receive Event.REMOVED_FROM_STAGE event. These events are used to detect when aSprite instance is added to, or removed from, the scene tree. For example, by the help of these events, it is possible to register Event.ENTER_FRAMEevent only for the sprites that are on the scene tree:
MySprite = gideros.class(Sprite)
function MySprite:init()
self:addEventListener(Event.ADDED_TO_STAGE, self.onAddedToStage, self)
self:addEventListener(Event.REMOVED_FROM_STAGE, self.onRemovedFromStage, self)
end
function MySprite:onAddedToStage(event)
self:addEventListener(Event.ENTER_FRAME, self.onEnterFrame, self)
end
function MySprite:onRemovedFromStage(event)
self:removeEventListener(Event.ENTER_FRAME, self.onEnterFrame, self)
end
function MySprite:onEnterFrame(event)
-- enter frame logic
end
10.7 Custom events
To dispatch a new custom, user defined event, create the event with Event.new() function and dispatch it with EventDispatcher:dispatchEvent().
ClassA = gideros.class(EventDispatcher)
ClassB = gideros.class(EventDispatcher)
function ClassA:funcA(event)
print("funcA", self, event:getType(), event:getTarget())
end
local a = ClassA.new()
local b = ClassB.new()
b:addEventListener("myevent", a.funcA, a)
ClassB = gideros.class(EventDispatcher)
function ClassA:funcA(event)
print("funcA", self, event:getType(), event:getTarget())
end
local a = ClassA.new()
local b = ClassB.new()
b:addEventListener("myevent", a.funcA, a)
-- when b dispatches an "myevent" event,
-- a.funcA will be called with 'a'
-- as first parameter
b:dispatchEvent(Event.new("myevent"))
-- a.funcA will be called with 'a'
-- as first parameter
b:dispatchEvent(Event.new("myevent"))
-- will print "funcA"
10.8 List of all built-in events
The following tables show a list of all built-in events in Gideros SDK, with a brief explanation of what they are for.
10.8.1 Frame & stage events
ENTER_FRAME
|
Dispatched to all Sprite instances before rendering the screen.
|
ADDED_TO_STAGE
|
Dispatched when target Sprite instance is added to the stage.
|
REMOVED_FROM_STAGE
|
Dispatched when target Sprite instance is removed from the stage.
|
10.8.2 Mouse events
MOUSE_DOWN
|
Dispatched to all Sprite instances on the scene tree when user presses the mouse button or starts the first touch.
|
MOUSE_MOVE
|
Dispatched to all Sprite instances on the scene tree when user moves the mouse or moves the first touch.
|
MOUSE_UP
|
Dispatched to all Sprite instances on the scene tree when user releases the mouse button or ends the first touch.
|
10.8.3 Touch events
TOUCHES_BEGIN
|
Dispatched to all Sprite instances on the scene tree when one or more fingers touch down.
|
TOUCHES_MOVE
|
Dispatched to all Sprite instances on the scene tree when one or more fingers move.
|
TOUCHES_END
|
Dispatched to all Sprite instances on the scene tree when one or more fingers are raised.
|
TOUCHES_CANCEL
|
Dispatched to all Sprite instances on the scene tree when a system event (such as a low-memory warning) cancels a touch event.
|
10.8.4 Application events
APPLICATION_START
|
Dispatched to all event listeners (broadcast event) right after the application is launched and all Lua codes are executed.
|
APPLICATION_EXIT
|
Dispatched to all event listeners (broadcast event) when the application is about to exit. If an application is forced to be terminated (e.g. by double tapping the home button and kill the application), this event may not be dispatched. If you want to save your game state before exiting, save your state also on APPLICATION_SUSPEND event.
|
APPLICATION_SUSPEND
|
Dispatched to all event listeners (broadcast event) when the application goes to background. When an application goes to background, ENTER_FRAME and TIMER events are not dispatched until the application is resumed from background.
|
APPLICATION_RESUME
|
Dispatched to all event listeners (broadcast event) when the application is resumed from background.
|
10.8.5 Sound & Timer events
SOUND_COMPLETE
|
Dispatched when a sound has finished playing.
|
TIMER
|
Dispatched whenever a Timer object reaches an interval specified according to the delay property.
|
TIMER_COMPLETE
|
Dispatched whenever a Timer object has completed the number of requests specified according to the repeatCount property.
|
10.8.6 UrlLoader events
COMPLETE
|
Dispatched after all data is received and placed in the data property of the UrlLoader object.
|
ERROR
|
Dispatched when UrlLoader fails and terminates the download.
|
PROGRESS
|
Dispatched by UrlLoader as the notification of how far the download has progressed.
|
10.8.7 Physics events
BEGIN_CONTACT
|
Dispatched by b2.World when two fixtures begin to overlap. This is dispatched for sensors and non-sensors. This event can only occur inside the time step.
|
END_CONTACT
|
Dispatched by b2.World when two fixtures cease to overlap. This is dispatched for sensors and non-sensors. This may be dispatched when a body is destroyed, so this event can occur outside the time step.
|
PRE_SOLVE
|
Dispatched by b2.World after collision detection, but before collision resolution.
|
POST_SOLVE
|
Dispatched by b2.World after collision resolution.
|
Немає коментарів:
Дописати коментар