
ОСНОВНЕ керівництво Gideros Studio
Зміст
Вступ
Вступ
- 1. Ласкаво просимо до студії Gideros
- 1.1 Підтримка платформи
- 1.2 Gideros Studio IDE
- 1.3 Gideros Studio SDK
- 1.4 Gideros Player
- 1.4.1 Запуск програвача
- 1.4.2 Режими перегляду
- 1.4.3 Орієнтація
- 1.4.4 Роздільна здатність
- 1.4.5 Частота кадрів
- 1.5 Загальна архітектура
- 1.6 Встановлення програми Gideros Studio
- 1.6.1 Передумови для створення iOS та Android
- 1.6.2 Встановити Java JDK
- 1.6.3 Встановити Eclipse
- 1.6.4 Встановлення Android SDK
- 1.6.5 Встановлення плагіна Android Development Tools (ADT) для Eclipse
- 1.6.6 Завантаження програми Gideros Studio
- 1.6.7 Встановлення для MS Windows
- 1.6.8 Установка для Mac OS X
- 1.6.9. Використання Gideros Studio під Linux
- 1.7 Запуск студії Gideros
- 1.8 Ваш самий перший код
- 1.8.1 Відображення Hello World
- 1.8.2 Відображення на пристрої
- 2. Початок роботи
- 2.1. IDE для Gideros Studio: Основи
- 2.3 Організація меню
- 2.4. Проектна панель*
- 2.5 Вихідна панель
- 2.6 Кодова панель
- 2.6.1 Вкладки файлів
- 2.6.2 Закладки
- 2.6.3 Автозавершення
- 2.7 Запуск вашої гри на програвач Gideros
- 2.7.1 пов'язані програвачі
- 2.8 Встановлення плеєра на Android
- 2.9 Встановлення програвача в iOS
- 2.10 Публікація вашої програми на iTunes
- 2.11 Публікація вашої програми на Android Market
- 2.12 Анатомія файлу проекту gproj
- 2.13 Комбінації клавіш
- Загальні ключі для ключів
- Спеціальні ключі Mac OS X для навігації
- 3. Введення в Lua
- 3.1 Огляд
- 3.2 Завдання та змінні
- 3.3 Основні функції
- 3.4. Маніпулювання рядком
- 3.5 Контрольні структури
- 3.6 масиви
- 3.7 Пов'язані списки
- 3.8 таблиці Lua (масиви)
- 3.9 Математичні функції
- 3.10 Файл вводу / виводу
- 3.10.1 Відкриття файлу
- 3.10.2 Закриття файлу
- 3.10.3 Отримання даних / введення
- 3.10.4 Тимчасові файли
- 3.10.5 Запис даних
- 3.10.6 Знайдіть вашу позицію у файлі
- 3.10.7 Буферизація
- 3.10.8 Очищення даних
- 3.10.9 Перевірка файлових операцій
- 3.11 ресурси LUA
- 4. Класи в Gideros
- 4.1 Створення екземплярів
- 4.2 Спадщина
- 4.2.1 Спадкування з класів за допомогою конструкторських аргументів
- 4.2.2 Додавання явних залежностей для успадкованих класів
- 4.2.3 Доступ до перевизначених функцій
- 5. Графіка та анімація
- 5.1 Вступ до графіки
- 5.2 етап
- 5.3 Текстури та растрові зображення
- 5.3.1 Прив'язка
- 5.3.2 Що таке Текстурний атлас?
- TextureRegion
- TexturePack
- Динамічне створення текстурних пакетів
- Фасовані текстурні пакети
- Отримання регіонів текстури від текстурних пакетів
- 5.4 Автоматична роздільна здатність зображення
- Дизайн для пристроїв високої роздільної здатності
- 5.5 Автоматичне масштабування екрану
- 5.6 Створення потоку і логіки гри
- 5.7 Управління сценою
- 5.7.1 Огляд використання сценарію менеджера
- 5.7.2 Вбудовані ефекти переходу
- 5.7.3 Перехідні події
- 5.8 шрифти
- 5.8.1 Растрові шрифти
- 5.8.2 Шрифти TrueType
- 5.8.3 TrueType шрифти з кешуванням
- 5.8.4 Метрика шрифтів
- 5.9 Малювання спрайтів
- 5.10 Використання текстур
- 5.11. Фігури
- 5.11.1 Система координат Gideros
- 5.11.2 Огляд використання
- 5.11.3 Малювання першого рядка
- 5.11.4 Нанесення прямокутника
- 5.11.5 Складання довільних багатокутників
- 5.11.7 Форма анкерної точки
- 5.11.6 Стилі рядка та заповнення
- 5.11.8 Правила обмотування
- 5.12. Використання табличних карт
- 5.13 Оптимізація та управління пам'яттю
- 5.14 Відстрочена анімація за допомогою Movieclip
Вступ
Авторське право
"ОСНОВНЕ керівництво для студії Gideros" - авторське право © 2011-2012 його авторів. Всі права захищені.
Вся книга може бути відтворена в інших формах (наприклад, електронним або письмових), без письмового дозволу авторів, за умови, що ця сторінка авторських прав залишається незмінною.
Ви можете відтворювати частини цієї книги на веб-сторінці або в друкованій формі за умови, що ви надаєте посилання на сторінку завантаження книги на www.giderosmobile.com для отримання останніх оновлень.
Ви можете відтворювати частини цієї книги на веб-сторінці або в друкованій формі за умови, що ви надаєте посилання на сторінку завантаження книги на www.giderosmobile.com для отримання останніх оновлень.
Переклад українською ОСНОВНЕ керівництво Gideros Studio - авторське право © 2017 його авторів. Всі права захищені.
Ви можете відтворювати частини цієї книги на веб-сторінці або в друкованій формі за умови, що ви надаєте посилання на сторінку автора перекладу https://simartinfo.blogspot.com
Для кого ця книга?
Ви можете відтворювати частини цієї книги на веб-сторінці або в друкованій формі за умови, що ви надаєте посилання на сторінку автора перекладу https://simartinfo.blogspot.com
Для кого ця книга?
Ця книга є для вас, якщо ви зацікавлені в програмуванні додатків на мобільних пристроях, особливо зацікавлених у швидкому розвитку мобільних додатків, зосереджуючись на мультиплатформенних парадигмах. Якщо у вас вже є досвід програмування, ви побачите, що мова Lua, що використовується в Gideros Studio, дуже проста, і кодування основного скелета вашої гри займе кілька тижнів , якщо не днів.
Остаточне керівництво до студії Gideros навчить вас, як програмувати використання фізики, створювати звук за допомогою аудіо бібліотек, підключатися до ресурсів в Інтернеті, використовувати можливості вашого пристрою та протестувати вашу програму за 1 секунду.
Ми вважаємо, що використання мови Lua є надзвичайно важливим для мобільного програмування за допомогою програми Gideros Studio, тому ми також охоплюємо основи Lua. Ця книга не занурюється в програмування Lua, а лише охоплює вступ, оскільки існує безліч довідкових посібників та посібників на рівні експертів для Lua.
Після закінчення цієї книги ви будете знайомі з найважливішими розділами студії Gideros і програмувати власну програму. Ми сподіваємось, що ця книга допоможе згладити навчальний шлях до створення мобільних додатків за допомогою програми Gideros Studio.
Автори
Після закінчення цієї книги ви будете знайомі з найважливішими розділами студії Gideros і програмувати власну програму. Ми сподіваємось, що ця книга допоможе згладити навчальний шлях до створення мобільних додатків за допомогою програми Gideros Studio.
Автори
Ця книга була написана наступними авторами:
- Caroline Begbie
- Atılım Çetin
- Görkem Çetin
- Nathan Doss
- Michael Hartlef
- Jayant Varma
- Deniz A. S. Çetin
Переклад українською:
Олег В. Симоненко
1.Ласкаво просимо до студії Gideros
Використання програми Gideros Studio є простим - Не потрібно знати C, C ++, Objective C, Java, .Net або будь-які інші структуровані, складні мови програмування. Студія Gideros надзвичайно проста у використанні для розробників Flash. Вона виграє від Lua, дуже простої мови сценаріїв.
Крім того, функції, які використовуються для обробки графіки та звуку, нагадують аналоги Flash, тому розробники Flash відчуватимуть себе вдома, коли вони починають розроблятись із Gideros Studio.
Крім того, функції, які використовуються для обробки графіки та звуку, нагадують аналоги Flash, тому розробники Flash відчуватимуть себе вдома, коли вони починають розроблятись із Gideros Studio.
Gideros Studio надає набір функцій та бібліотек для швидкої розробки. Використовуючи кілька рядків, ви можете створювати приголомшливі анімації для електронних книг, ігор та загальних програм. Нижче наведено список функцій SDK Gideros Studio:
- Підтримка платформи Android і iOS
- Повністю нативний, реалізований за допомогою OpenGL
- iOS ; Плагіни для Android - справжня підтримка коду
- 2D сцени графі
- аналітичні програми з Flurry analytics
- Сенсор та акселерометр
- Автоматичні та попередньо розрахункові текстурні пакети
- Відтворення звуку
- Сцени переходи
- Фізичний двигун (Box2d)
- Бібліотека Movieclip
- Твінінг бібліотека
- Створювач шрифтів
- Відтворювач шрифтів
- 30 + ефектів (tweening) функції
- Ландшафтний та портретний режими
- Глобальна пауза / відновлення таймера
- Sprites ; сторінка спрайтів
- 32 бітні текстури
- Текстурний атлас
- Швидкі ортогональні тайлмапс
З Gideros Studio, результуючий виконуваний файл буде виглядати як будь-яка інша програма iPhone, iPad або Android. Продуктивність додатків, розроблених за допомогою Gideros SDK, порівнянна або краще від тих програм, розроблених з використанням інших аналогічних фреймворків.
Студія Gideros може бути використана для побудови виконуваних файлів на хості (наприклад, на вашому настільному комп'ютері), без передачі вашої програми на інший сервер для будівництва. Це заощаджує багато часу та енергії, і ви можете бути впевнені, що ваша інтелектуальна власність ні в якому разі не буде скомпрометована.
1.1 Підтримка платформи
Студія Gideros працює на різних операційних системах, включаючи Microsoft Windows, Mac OSX та Linux. Наразі завантажувана версія доступна лише для платформи Microsoft і Mac OS X, і за допомогою Wine можна запускати Gideros Studio під Linux. В основному на кожній платформі ми рекомендуємо 1 ГГц або більше процесорів, 1 Гб оперативної пам'яті і щонайменше 300 Мб вільного місця на диску.
Графічні програми Gideros Studio запускаються на платформах ARMv6 та ARMv7.
Мінімальні вимоги для iOS та Android:
Є деякі конкретні пристрої Android, які мають проблеми для запуску програм Gideros, в основному ті, які мають різні ключі, які взаємодіють із кінцевим користувачем. Ці апаратні ключі можуть не підтримуватися. Якщо у вас виникли сумніви, зв'яжіться зі службою підтримки Gideros Mobile або форумами Gideros Mobile.
Графічні програми Gideros Studio запускаються на платформах ARMv6 та ARMv7.
Мінімальні вимоги для iOS та Android:
- iOS: IPod Touch 2-го покоління або краще,
- iPhone 2 або краще,
- iPad 1 або вище
- Android: принаймні Android 2.2.
- Зверніть увагу, що попередні версії Android (2.1 або нижче) не працюватимуть.
Є деякі конкретні пристрої Android, які мають проблеми для запуску програм Gideros, в основному ті, які мають різні ключі, які взаємодіють із кінцевим користувачем. Ці апаратні ключі можуть не підтримуватися. Якщо у вас виникли сумніви, зв'яжіться зі службою підтримки Gideros Mobile або форумами Gideros Mobile.
1.2 IDE студії Gideros
Студія Gideros поставляється з інтегрованою IDE, що дозволяє швидко розвивати програми для iPhone, iPad та Android. Він має такі орієнтовані на розробників функції, як завершення коду, підсвічування синтаксису та управління проектами. Студія "Gideros" допомагає організувати ресурси, запобігати помилкам та надавати більш короткі способи у процесі розробки.
Під час збирання програма Gideros Studio переводить код з Lua на власний код цільової платформи.
Iвключає кілька інструментів для швидкого та ефективної розробки.
Під час збирання програма Gideros Studio переводить код з Lua на власний код цільової платформи.
Iвключає кілька інструментів для швидкого та ефективної розробки.
- Gideros Player: Gideros Player - це симулятор у комплекті з Gideros Studio, який має можливість запускати код, розроблений за допомогою цієї IDE. Він забезпечує екрани iPhone, iPad та Android з різними дозволами (наприклад, iPhone, iPhone4, Nexus S тощо). Gideros Player також є ім'ям програми, яка може працювати на мобільному пристрої, для тестування миттєвого застосування
- Font Creator: Gideros Font Creator в основному генерує шрифт з шрифтів TrueType та OpenType для використання в Gideros Studio. Він підтримує 8-бітні шрифти, а також азіатські шрифти, такі як китайські.
- Texture Packer: Gideros Texture Packer упаковує багато менших підображень в один великий атлас текстури. Ви можете швидко бачити і налаштовувати результати, оскільки процес дуже швидкий і оптимізований. Він підтримує автоматичне обрізування прозорих областей, щоб зменшити розмір остаточної текстури..
IDE студії Gideros написано в Qt, використовуючи IDE і SDK Qt Creator.
1.3 Gideros Studio SDK
Студія Gideros включає в себе всеосяжний, простий у використанні та зрозумілий SDK, що містить більше 470 функцій API. Це дає програмістам сильну, повну структуру для побудови їх застосування. У наведеній нижче таблиці наведено короткий огляд списку функцій у SDK Gideros.
Категорії функцій
|
визначення
|
Event Dispatcher
|
Центральний механізм для відправлення подій
|
Event
|
Об'єкти класу Event містять інформацію про подію, що сталася
|
Sprite
|
Клас Sprite є базовим класом для всіх об'єктів, які можна розмістити на дереві сценарію. Це основний ієрархічний будівельний блок.
|
Stage
|
Клас Stage являє собою верхню частину ієрархії дерева сцен.
|
TextureBase
|
TextureBase - це базовий клас для Texture та TexturePack класів. Це забезпечує загальну функціональність класів, пов'язаних із текстурою.
|
Texture
|
Клас текстури дозволяє працювати з текстурами в додатку. Це дозволяє створювати новий об'єкт Texture для завантаження з файлу зображення та відображення на дереві сценарію.
|
TextureRegion
|
Клас TextureRegion вказує текстуру та прямокутну область. Він використовується для визначення незалежних текстурних областей у текстурному атласі, який є великим зображенням, яке містить багато менших підображень.
|
TexturePack
|
Клас TexturePack визначає пакет текстур (або текстурний атлас)
|
Bitmap
|
Клас Bitmap використовується для показу текстурних об'єктів у дереві сценарію
|
Font
|
Клас 'Font' використовується для використання шрифтів, створених Gideros Font Creator.
|
TextField
|
Клас TextField використовується для створення відображення об'єктів для текстового відображення.
|
Shape
|
Клас Shape використовується для створення та відображення векторної графіки.
|
Tilemap
|
Клас TileMap використовується для роботи з картами тайлів легко та ефективно.
|
Movieclip
|
Клас MovieClip використовується для створення статичних тимчасових анімацій.
|
Application
|
Клас застосування містить загальні функції, доступні для поточної програми.
|
OS
|
Надає інтерфейс для функцій ОС, наприклад, таймер
|
Sound
|
Клас Sound дозволяє завантажувати та відтворювати звукові файли у форматі WAV або MP3.
|
SoundChannel
|
Клас SoundChannel використовується для керування та відтворення звукового сигналу
|
UrlLoader
|
Клас UrlLoader використовується для завантаження даних з URL-адрес.
|
Timer
|
Клас Таймер використовується для виконання коду з певними інтервалами.
|
Matrix
|
Клас Matrix вказує 2D перетворення з одного координатного простору на інше
|
b2
|
Включає b2.World, b2.Body, b2.Fixture, b2.Shape, b2.PolygonShape, b2.CircleShape, b2.EdgeShape, b2.Joint, b2.RevoluteJoint, b2.PrismaticJoint, b2.DistanceJoint, b2.PulleyJoint, b2 .MouseJoint, b2.GearJoint, b2.WheelJoint, b2.WeldJoint, b2.FrictionJoint, b2.DebugDraw
|
Geolocation
|
Клас геолокації наслідує наступний клас: EventDispatcher
|
Gyroscope
|
Клас гіроскопа використовується для доступу до даних гіроскопа.
|
SDK завжди вдосконалюється розробниками. Деякі рідко використовувані функції надаються як плагіни, щоб не захаращувати основний SDK Gideros.
Остання SDK завжди поставляється з пакетом Gideros Studio, який ви завантажуєте для своєї операційної системи.
Якщо ви хочете прочитати останню довідкову інструкцію, перейдіть до Gideros Academy ; Довідковий посібник (http: // www.giderosmobile.com/gideros-academy).
Остання SDK завжди поставляється з пакетом Gideros Studio, який ви завантажуєте для своєї операційної системи.
Якщо ви хочете прочитати останню довідкову інструкцію, перейдіть до Gideros Academy ; Довідковий посібник (
1.4 Gideros Програвач
Студія Gideros поставляється в комплекті з програвачем Gideros, який може бути використаний для перевірки ваших програм на льоту, не відправляючи її на реальний пристрій. Він забезпечує метод взаємодії з вашим пристроєм за допомогою миші для імітації дотиків. Те, що ви бачите на плеєрі, не є емуляцією,тому, те що ви бачите на програвачі Gideros, буде ідентично схожим з готовою программою, коли ви надішлете його на своєму мобільному пристрої.
В основному, коли ми говоримо про Gideros Player, ми маємо на увазі одного і того ж програвач на пристроях iOS, Android, Mac OS X та настільних ПК MS Windows. Якщо ви встановите плеєр на iOS або Android, то ви зможете протестувати свої програми на цих платформах. Якщо у вас немає пристрою, то це нестрашно-Студія Gideros має десктопний програвач, який працює так само, як і на реальному пристрої. Однак, неможливо буде протестувати деякі функції, що постачаються з пристроями, як акселерометр, гіроскоп та компас.
1.4.1 Запуск програвача
Якщо ви хочете запустити програвач та перевірити свій код у програмі Gideros Studio, виконайте такі дії:
- Відкрийте студію Gideros
- Переконайтеся, що Налаштування програвача показують 127.0.0.1 як IP-адресу програвача (який вказує на програму програвача на вашому робочому столі)
- Запустити програвач - Запустіть локальний плеєр
Тепер ви побачите плеєр на своєму робочому столі, готовий запустити вашу програму. Для зручного режиму перегляду натисніть кнопку Перегляд; Завжди зверху, і ваш програвач завжди буде видно на робочому столі.
Наступні кроки формують основний життєвий цикл вашого процесу тестування:
- Ви кодуєте, використовуючи Lua в студії Gideros
- Ви керуєте своїми ресурсами (наприклад, файлами Lua, звуками, графікою на панелі проекту Gideros Studio)
- Gideros Player залишається над усіма іншими вікнами.
- Натисніть Ctrl-R (запустити) - і ваш код буде негайно скомпільовано та виконано у програвачі, використовуючи зворотні виклики C ++.
- Тестування вносячи потрібні зміни та інтегруючи вашу заявку знову і знову, ви робите ідеальну програму.
Тепер давайте поглибимо знайомство з програвачем трохи більше, подивившись кілька варіантів меню.
1.4.2 Режими перегляду
Студія Gideros має два режими перегляду - 50% та 100%. Режим перегляду половинчастий (50%) режим особливо корисний під час спроби застосування вашої програми на iPad, коли розмір екрану менший, а роздільна здатність iPad - більша, ніж роздільна здатність монітора.
1.4.3 Орієнтація
Gideros Player підтримує 4 різні варіанти орієнтації, наведені нижче:
- Портрет
- Пейзаж ліворуч
- Портрет верхногами
- Пейзаж праворуч
Для повороту пристрою також є пункти "Повернути вліво" та "Поворот праворуч" у меню.
1.4.4 Роздільна здатність
Для вашої зручності програвач Gideros включає декілька параметрів роздільної здатності. Це зручно, коли ви розробляєте більше ніж одну роздільну здатність (це майже завжди є), або декілька операційних систем. Наприклад, якщо ви хочете побачити, як ваша програма виглядає на пристроях iOS, виберіть iPhone, iPhone4 + або iPad.

З іншого боку, оскільки Android працює на декількох пристроях із різними дозволами, ви можете побачити, як ваш екран відображається в різних дозволах, використовуючи записи меню для Android, на пристроях iOS.
1.4.5 Частота кадрів
На мобільних пристроях природна частота кадрів, як правило, 60. Це більш ніж достатньо для найшвидших ігор там (однак є деякі пристрої з частотою кадрів 100). Зазвичай ця частота кадрів може бути встановлена до 60. Якщо з якоїсь причини ви хочете встановити іншу частоту кадрів, ви можете вибрати 30 або 15. Це, однак,
не змінює частоту кадрів на пристрої.
не змінює частоту кадрів на пристрої.
Підказка: для деяких ігор вам може знадобитися встановити до 15 кадрів на секунду, щоб переглянути деталі, щоб усунути деякі графічні елементи.
|
1.5 Загальна архітектура
Студія Gideros має багатошарову архітектуру. Середній шар складається з функцій OpenGL та C ++. Мова сценаріїв підтримується Lua, 10-ій найпоширенішою комп'ютерною мовою у світі. Віртуальна машина Lua (LuaVM) перетворює функції та зворотні виклики у функції C + + і OpenGL, і кожна графічна команда перетворюється безпосередньо на екран за допомогою пристрій OpenGL пристрою. Це призводить до дуже високої продуктивності додатків та ігор.

Зверху вниз, наступні частини складають всю систему Gideros:
- Gideros Studio IDE: Повна, міжплатформенна IDE
- Bridge: Роз'єм між C ++ API та IDE
- C++ API: Конвертація API Lua викликає певні виклики для машини
- Libraries: Зовнішні бібліотеки, використані в проекті
- Platform: Весь SDK
- Hardware: Або iOS (iPhone, iPad, iPod) або Android
1.6 Встановлення програми Gideros Studio
У цьому розділі наведено відомості про завантаження, встановлення або оновлення Gideros Studio для різних платформ. Ви також знайдете системні вимоги для кожної операційної системи.
1.6.1 Необхідні умови для створення iOS та Android
Ви можете використовувати Gideros Studio автономно, не встановлюючи інші сторонні програми для створення вашої програми. Таким чином, ви можете оцінити програмне забезпечення, запустити свою програму під програвачем Gideros і подивитися, як вона буде відчуватись. Однак, можливо, неможливо буде протестувати деякі функції, що постачаються з пристроєм, наприклад, гіроскоп та акселерометр.
Щоб скомпілювати програм для для iPhone / iPad, вам знадобиться наступне:
- 64-бітний Mac OS X Snow Leopard або Mac OS X Lion (для складання та підписання)
- Xcode (версія 3 або більше)
- Apple Developer License
Щоб створити для Android, вам потрібно виконати наведені нижче дії (зауважте, що для створення iPhone або iPad не потрібно використовувати жоден із перелічених нижче програм. Якщо ви збираєтеся створювати пристрої iOS, пропустіть ці кроки).
- Java SDK
- Eclipse IDE
- Останній Android SDK (4.0 або вище)
- Інструменти для розробки Android (ADT)
- Ліцензія на розробника Google (див. Також посібник для розробників Android тут: http://developer.android.com/guide/index.html).
1.6.2 Встановити Java JDK
Java потрібен, якщо ви хочете змінити, розширити і побудувати свою програму, використовуючи Eclipse IDE.
Щоб встановити Java JDK, виконайте такі дії.
Щоб встановити Java JDK, виконайте такі дії.
- Перейдіть на сторінку http://www.oracle.com/technetwork/java/javase/downloads/index.html
- Натисніть на Java 7 JDK
- Виберіть свою платформу
1.6.3 Встановити Eclipse
Eclipse потрібен для створення файлів APK для Android. Якщо ви не збираєтеся будувати під цю платформу, то можете пропустити цей крок.
Щоб встановити Eclipse, виконайте такі дії:
Щоб встановити Eclipse, виконайте такі дії:
- Перейти на http://eclipse.org/downloads/
- Виберіть свою операційну систему
- Виберіть 32 або 64 біт, залежно від вашої операційної системи, і завантажте "Eclipse IDE для розробників Java".
- Видобудьте архівний файл до папки
Eclipse тепер готовий до запуску.
1.6.4 Встановлення Android SDK
Ми радимо використовувати останню версію SDK для Android. Щоб встановити Android SDK, виконайте такі дії:
- Перейдіть за адресою http://developer.android.com/sdk/index.html
- Завантажте та встановіть пакет для вашої платформи.
- Запустити інструменти / Android (Android SDK і AVD Manager).
- Натисніть Доступні пакети.
- Встановити останній SDK.
1.6.5 Встановлення плагіна Android Development Tools (ADT) для Eclipse
ADT розширює Eclipse, щоб швидко налаштувати нові проекти Android, створювати інтерфейс програми, додавати компоненти на базі API Android Framework, налагоджувати програми за допомогою інструментів Android SDK та навіть експортувати підписані (або непідписані) файли .apk
Gideros Studio може експортувати вихідний код Java, модифікувати свій код, перш ніж створити остаточний файл APK (пакет Android).
Встановіть плагін ADT для Eclipse за допомогою кроків установки, визначених тут: http://developer.android.com/sdk/eclipse-adt.html.
Gideros Studio може експортувати вихідний код Java, модифікувати свій код, перш ніж створити остаточний файл APK (пакет Android).
Встановіть плагін ADT для Eclipse за допомогою кроків установки, визначених тут: http://developer.android.com/sdk/eclipse-adt.html.
1.6.6 Завантаження програми Gideros Studio
Ви можете завантажити Gideros Studio з сторінки завантаження Gideros Studio (http://www.giderosmobile.com/download) Завантаження та встановлення Gideros Studio безкоштовне. Там ви також побачите бета-версії, і вам рекомендується їх використовувати, але переконайтеся, що бета-програма може містити деякі помилки.
Примітка: . Gideros Studio for Windows дозволяє створювати програми для iOS та Android. Ви можете побачити вашу програму, яка працює на Gideros Player, або краще, побачити її на реальному пристрої, встановивши плеєр на iPhone, iPad або Android.
.
Системні вимоги для всіх платформ
- 1 Ghz processor
- 1 Gb RAM
- 210 Mb disk space for MS Windows
- 340 Mb disk space for Mac OS X
- OpenGL based graphics card
Примітка: . Програма Gideros Studio використовує OpenGL (особливо OpenGL ES на мобільних пристроях). Деякі старі пристрої Android не підтримують OpenGL-карту. У цьому випадку ваша програма може бути занадто повільною для запуску, і не очікуйте на велику продуктивність, особливо в програмах, багатих для анімації.
.
1.6.7 Встановлення для MS Windows
Двічі клацніть на виконуваному файлі, який ви завантажили, і виконайте такі дії:
Це воно. Тепер перейдіть до меню "Пуск" і натисніть на Gideros Studio".
- Виберіть папку призначення
- Натисніть кнопку "Установити"
Це воно. Тепер перейдіть до меню "Пуск" і натисніть на Gideros Studio".
1.6.8 Встановлення для Mac OS X
Щоб встановити Gideros Studio для Mac OS X, виконайте такі дії:
- Двічі клацніть файл .dmg, щоб його монтувати
- Перетягніть папку Gideros у свою директорію Applications
1.6.9Використання Gideros Studio під Linux
Студія Gideros спочатку працює під Mac OS X та Windows. Однак запустити цю програму можна під Linux, використовуючи чудовий емулятор Windows, Wine. Вино піклується про відображення функцій MS Windows до Linux. Є кілька складних додатків MS Windows, які працюють під Linux з повною продуктивністю, завдяки розробникам Wine.
Перший,
встановити вино:
apt-get install wine
IЯкщо ви використовуєте Центр програмного забезпечення, виконайте наступне:
- Відкрити Центр програмного забезпечення
- Введіть "wine" і встановіть wine
Тепер завантажте останню версію, а потім за допомогою командного рядка введіть "wine", а потім назву програми. Інсталятор розповість вам, як продовжити, і знайдіть кожний файл у вашому домашньому каталозі.
Після установки ви побачите пункт меню "Вино" в Ubuntu під пунктом "Програми". Перейдіть до Wine → Програми → Gideros Studio і запустіть "Gideros Studio".
Після установки ви побачите пункт меню "Вино" в Ubuntu під пунктом "Програми". Перейдіть до Wine → Програми → Gideros Studio і запустіть "Gideros Studio".
1.7 Запуск студії Gideros
Після установки програма Gideros Studio встановлюється в папці ваших програм. Існує також ще 3 окремі додатки, що постачаються з інсталяцією, крім бінарних файлів Gideros: Gideros Font Creator, Gideros Player та Gidero Texture Packer.
Коли ви закриваєте студію Gideros, вона запам'ятає останню геометрію, яку вона мала при закритті, і відкрити з тими ж розмірами, коли знову почнеться. Відкриті вкладки також запам'ятовуються для кожного проекту
Коли ви закриваєте студію Gideros, вона запам'ятає останню геометрію, яку вона мала при закритті, і відкрити з тими ж розмірами, коли знову почнеться. Відкриті вкладки також запам'ятовуються для кожного проекту
1.8 Ваш самий перший код
Тепер, коли ви встановили Gideros Studio, було б цікаво подивитися, як це працює. Давайте подивимося на приклад Hello World, щоб почати.
1.8.1 Відображає Hello World
Найпростіший спосіб відобразити щось на консолі, і шлях до досягнення цього полягає у використанні оператора print lua
ми введемо цей код у файл main.lua
print("Hello World")
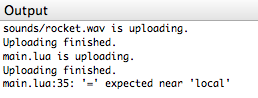
Тепер клацніть на меню Програвач → Почати локальний плеєр, коли з'явиться вікно програвача, ви побачите синє програвання та червоні кнопки зупинки. Натисніть кнопку відтворення і подивіться у вікно виводу. Ви побачите три рядки
main.lua is uploading
Uploading finished.
Hello World
Ми успішно створили перший мобільний додаток "Hello World" за допомогою програми Gideros Studio.
1.8.2 Відображення на пристрої
Можливо, ви помітили, що текст Hello World відображається на консолі, а не на пристрої або тренажері (програвач Gideros). Можливо, буде корисно мати на консолі друк налагоджувальних повідомлень, але на пристрої це не дуже корисно, оскільки на пристрої немає консолей.
Тому давайте розглянемо, як відображати пристрій Hello World.
Тому давайте розглянемо, як відображати пристрій Hello World.
-- HelloWorld.lua тестовий скрипт
-- Створіть нове текстове поле з текстом Hello World! Шрифт
-- Параметр встановлено на нуль, тому Gideros буде використовувати шрифт за замовчуванням
local myTextField = TextField.new(nil, "Hello World!")
-- Позиціонувати текстове поле в координатах 40 100
-- Без цього ви не побачите текст як за замовчуванням
-- шрифт буде розміщений над областю видимого полотна.
-- Без цього ви не побачите текст як за замовчуванням
-- шрифт буде розміщений над областю видимого полотна.
myTextField:setPosition(40,100)
-- Додайте текстове поле до сцени
stage:addChild(myTextField)
2. Початок
У цьому розділі пояснюються ваші кроки у програмі Gideros Studio
2.1 IDE для студії Gideros: Основи
Коли ви запускаєте програму Gideros Studio, вона відкривається в режимі очікування та відображає інформаційну панель. Тут ви можете зробити наступне:
- Створюйте та відкривайте проекти
- Прочитайте Посібник із початку роботи
- Прочитайте довідковий посібник
- Відкрийте всі останні проекти та сесії
- Відкриті підручники та 30 прикладів проектів
Тепер відкрийте приклади та перегляньте всі файли з лівого боку, , панелі проекту прикладів.
2.3 Організація меню
- Gideros Studio - це дуже легкий і простий у користуванні IDE. Організація меню також проста та легко зрозуміла. Нижче ви можете побачити кожне меню і те, що вони роблять.
- File menu: Тут ви можете відкрити, зберегти, закрити проект або зберегти свої останні проекти. Це також місце, де ви експортуєте свій код в Eclipse або XCode
- Edit menu: Забезпечує основний механізм редагування , таких як відміна, відновити, вирізання, копіювання, вставка, пошук та інше
- Compile menu: Це меню використовується для перевірки синтаксису коду, шляхом складання проекту та написання можливих помилок на вихідній консолі
- Player menu: Запускає програвач Gideros на робочому столі або запускає програму на плеєрі (яка може бути на мобільному пристрої або на стільниці). Якщо ви хочете протестувати свою програму, потрібно встановити плеєр на пристрій, який пояснюється в наступних розділах.
- Help:Включає посилання на Центр розробників та Довідкове керівництво (документація API)
Зауважте, що ви можете охопити багато пунктів меню за допомогою ярлика або акселератора
2.4 Панель Project
На панелі проекту відображаються файли проекту, включаючи всі файли Lua та активи, такі як графіка та звук. Всі файли, додані до проекту, можна побачити тут.
Якщо ви хочете додати файл Lua тут, клацніть правою кнопкою миші на назві проекту та натисніть "Додати новий файл". Це додасть новий файл Lua до проекту. Якщо у вас є існуючий файл (наприклад, Lua, PNG,JPEG тощо), а потім натисніть "Додати існуючий файл". Ці файли не будуть скопійовані в папку проекту.
Якщо ви хочете додати файл Lua тут, клацніть правою кнопкою миші на назві проекту та натисніть "Додати новий файл". Це додасть новий файл Lua до проекту. Якщо у вас є існуючий файл (наприклад, Lua, PNG,JPEG тощо), а потім натисніть "Додати існуючий файл". Ці файли не будуть скопійовані в папку проекту.

2.5 Output pane
The output pane will give you valuable information when you run your project in a player. For one you will see which assets are transferred to the player. Also you will see error messages from Lua in the output pane:
2.6 Code pane
The code pane is your playground where you create your magic. Means there you type in the Lua code that creates the application of your dreams. It supports syntax color highlighting which depends on the actual code. Comments in Lua are colored differently from string values or Lua keywords.

2.6.1 File tabs
For every file you have currently opened in Gideros Studio, there will be a tab with its name above the code area.

To navigate between this files, just click on the name and the code area will change to this file. If you want to close the file, just click on the little X next to the name of the file.
2.6.2 Bookmarks
If you have bookmarked a line or more in your code, the gutter on the left, which shows the line numbers by default, will show little triangles to indicate that a bookmark was set there:
To set, remove and navigate between the bookmarks, use the icons on the toolbar.

2.6.3 Auto completion
The code pane of Gideros Studio also supports you with an auto completion feature which you will love. Depending on what you type in, it will make suggestions on what could be inserted and you can chose from a list box a method/function that you would like to use.
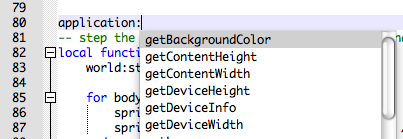
If you don’t want that, just press the escape key and the box will close automatically.
2.7 Running your application on Gideros Player
To get your first sample script running in the Gideros desktop player, you need to start it actually. The fastest way is to click on that little game controller icon in the toolbar. Gideros Studio will now start the GiderosPlayer application and shortly you should see the player on your desktop:

The player will start always in the last chosen orientation, resolution and zoom factor. Please note that the Start and Stop icons become active when a linked player is running.

2.7.1 Linked players
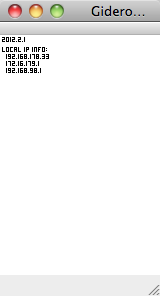
To switch the linked player, you need to set the IP address in Gideros Studio. Click in the menu on “Player/Player settings...”. This will open the player settings dialog where you can set the IP address of the player you want to use over WLAN or the desktop (Localhost) player:

To identify the IP of a player on a device, just start it there and it will tell you the IP address under LOCAL IP INFO. Make sure that your device has access to the WLAN or it will display your direct Internet IP (e.g the IP you use for GPRS connection like Edge or 3G), and this one won’t be useful for Gideros Studio :-)
2.8 Installing player on Android
Gideros ships with a pre-compiled player app for your Android device. It is located inside the main Gideros folder and is called GiderosAndroidPlayer.apk. There are two ways to actually load the apk file onto your device. For both, make sure that you set the options in your device to allow the installation of non-market apps. This options has to be activated in your phone under
Settings->Applications->Unknown sources.
The first method is to upload the apk file to your web space and then point your device via your web browser to the location of the player apk file in the web.
The second method is to connect the phone to your computer and upload it with the ADB command. For this, the Android SDK and tools have to be installed. Please study the link below for further information about how to do this:
To load the player app via ADB, open the console terminal on your computer and type in the following:
adb install GiderosAndroidPlayer.apk
Shortly you will get a message that the player was installed on your device.
2.9 Installing player on iOS
For your iOS device, you need to build and sign the player application yourself. Like everything for iOS, this has to be done within XCode. Please unzip the GiderosiPhonePlayer.zip archive to a location of your choice. Start XCode and load the
GiderosiPhonePlayer.xcodeproj
project. Inside XCode, browse to the resource section in the “Groups and Files” list box and there open the GiderosiPhonePlayer-Info.plist. Here you need to set the bundle identifier to the app ID you have used to create a provisioning profile in the iOS Provisioning Portal.
After you have made your changes, save it and open the project settings. There you need to set the code signing identity to the one of your provisioning profile. If it doesn’t show up, then you have forgotten to actually install it. And make sure that you set the code signing identity in the configuration you want to use when you build the player. Close the settings and then Build and Run the player. If everything was set right, you will see the icon for the player show up in your device which should look like this:

2.10 Publishing your application to iTunes
2.11 Publishing your application to Android Market
2.12 Anatomy of a gproj project file
2.13 Keyboard shortcuts
Some functionality of Gideros Studio and the code area can only be reached via shortcuts. Here is a list of the current supported shortcuts:
General key bindings
Note: Under Mac OS X, use Command button instead of Control.
- Control - N : New project
- Control - O : Open project
- Control - Q : Exit
- Control - F : Find
- Control - H : Replace
- Control - G : Go to line
- Control - W : Quit
- Control - U : Make all lowercase
- Control - L : Delete line
- Control - D : Open a new line
- Control - S : Save current file
- Control - A : Select all
- Control - Z : Undo
- Control - Y : Redo
- Control - X : Cut
- Control - C : Copy
- Control - V : Paste
- Control - B : Compile
- Control - R : Start
- Control - + : Increase font size
- Control - - : Decrease font size
- Control - Tab : Switch to next tab
- Control - Shift - R : Stop
- Control - Shift - P : Start local player (starts desktop player with IP = 127.0.0.1)
- Control - Shift - F : Find in files
- Control - Shift - B : Compile all
- Control - F2 : Toggle bookmark
- F2 : Go to next bookmark
- Shift - F2 : Goto previous bookmark
- F3 : Find next
- Shift - F3 : Find previous
Specific Mac OS X key bindings for navigation
(command button)
- command + left: start of line
- command + right: end of line
- command + up: beginning of document
- command + down: end of document
- command + backspace: delete line to the left
(option button)
- option + left: move to next word on the left (case insensitive)
- option + right: move to next word on the right (case insensitive)
- option + backspace: delete word to left
(control button)
- control + left: move to next word on the left (case sensitive)
- control + right: move to next word on the right (case sensitive)
- control + up: page up
- control + down: page down
- control + backspace: delete word to left (same with option + backspace)
Also you can see the list online in the Gideros DevCenter:
3. Introduction to Lua
3.1 Overview
Lua was created in 1993 by Roberto Ierusalimschy, Luiz Henrique de Figueiredo, and Waldemar Celes, members of the Computer Graphics Technology Group at PUC-Rio, the Pontifical University of Rio de Janeiro. Gideros Studio benefits from Lua, a powerful, fast, lightweight, embeddable scripting language. Lua’s power comes from its simplicity and speed. Lua is mentioned as the fastest language among all interpreted scripting languages.
Lua is used in commercial applications, including Adobe's Photoshop Lightroom, World of Warcraft, Far Cry, Garry's Mod, Supreme Commander and Sonic the Hedgehog. It’s widely used in many applications, where speed and convenience is sought. You also write your applications in Lua inside Gideros Studio, however can also extend your apps with other languages like Objective-C, C++, C or Java.
Despite the size of the Lua interpreter (about 150Kb in size), Lua is a very rich, extensive and expandable programming language. Applications written using Lua looks very clean and understandable, yet effective.
Let’s start with printing a sentence, by writing down the following and running in Gideros Studio:
print ("Hello, Gideros Studio")
Here print() is a Lua function. We invoke a function using a paranthesis, and print takes the text between double quotes and writes to standard output.
We use "--" to start a comment, or use --[[ to start a mult-line comment. Consider this example:
--[[ This is a multi-line Lua comment
Where comment goes on and on...
And on...
]]
Let’s dig into Lua more.
3.2 Assignments and variables
Lua is a dynamically-typed language, that is, variables don't have types, only the values. All values carry their own type. Consider the following as an example:
MyTable = wide
width = 3; height = 1.5
area = width * height
print (area)
You can nest several lines using semicolons, but it’s optional and generally not a good programming habit as it decreases the readability of your code.Be careful not to use reserved words. Gideros Studio will complain when you use a reserved word in Lua. Consider this example:
local = 1
Since Lua is a small language, it only has 8 basic data types:
- nil (null)
- Booleans
- Numbers
- Strings
- Functions
- Userdata
- Threads
- Tables
Global variables in Lua do not need to be declared. If you want to declare a variable, just assign a value to it. Giving it a nil value removes the variable. In fact, when a variable is removed, and it’s not referenced by another variable, it’s ready to be cleared up from memory, thanks to the wonderful Lua garbage collector.
Lua can support multiple assignments. Check the following assignment:
a, b, c = 1, 2, 3
-- Easy method to swap two variables
x, y = y, z
-- Function can return multiple values
n, m = calculate (phi, zeta)
3.3 Basic functions
Lua has the ability to call its own functions or C functions, and it handles functions as a "data type". Note that functions can return multiple values, and you can use multiple assignments to collect these functions.
function calculate(w, d, h)
if h > 4 then
if h > 4 then
print ("height of the room cannot be more than 4”)
return
end
volume = w * d * h
return volume
end
-- Calculate the volume of the room
print (calculate (4,3,4))
Try the function above, this time with values 4,5,5.
3.4 String manipulation
Lua has a powerful set of string manipulation functions, such as finding and extracting substrings. Unlike C, the first character of the string has "1" as the position index. You can also use negative indices in a string just like Python does - e.g the last character in a string is at position -1. You can use both methods, whichever you find convenient.
Note that the string library assumes one-byte character encodings.
The following table gives an overview of string manipulation commands. Have a look at them, and then study the examples below.
String command
|
Meaning
|
string.byte (s [, i [, j]])
|
Returns the internal numerical codes of the characters s[i], s[i+1], ···, s[j]. The default value for i is 1; the default value for j is i.
|
string.find (s, pattern [, init [, plain]])
|
Looks for the first match of pattern in the string s. If it finds a match, then find returns the indices of s where this occurrence starts and ends; otherwise, it returns nil
|
string.format (formatstring, ···)
|
Returns a formatted version of its variable number of arguments following the description given in its first argument (which must be a string).
|
string.gmatch (s, pattern)
|
Returns an iterator function that, each time it is called, returns the next captures from pattern over string s.
|
string.len (s)
|
Returns the length of the string s.
|
string.lower (s)
|
Changes all characters of a string to lowercase.
|
string.upper (s)
|
Changes all characters of a string to uppercase.
|
string.reverse (s)
|
Returns a string which is a reverse of the string s.
|
3.5 Control structures
Lua provides a strong control mechanism between different variable types. As an example for logical decisions, consider the following:
Logical decision
|
Meaning
|
A and B
|
If A is true, then return the result of expression B.
If A is false, then return A
|
A or B
|
If A is true, then return the result of expression A
If A is false, then return B
|
As an example, consider the following:
[...]
3.6 Arrays
Arrays that can be indexed not only with numbers, but with any value. Arrays do not have to be defined a size, and they can grow as needed. When an array is defined, and you try to reach a value exceeding the boundary, you get a nil (instead of zero).
Arrays can have any index, e.g you can start with an array with -5, 0 or 1 - it’s all up to you. Consider the following example:
-- creates an array with indices from -2 to 2
array = {}
for i=-2, 2 do
array[i] = "apples"
end
for i=-2, 2 do
array[i] = "apples"
end
Lua also supports multi-dimensional arrays, which we call "matrices".
Consider the following example. A similar array syntax can be used to create string lists. The statement below:
animals = {"giraffe", "boar", "wolf", "frog"}
is equal to:
animals = {}
animals[1] = "giraffe"; animals[2] = "boar"
animals[3] = "wolf"; animals[4] = "frog"
3.7 Linked lists
3.8 Lua tables (arrays)
In Lua, Tables and Arrays are terms so used interchangeably, However this is true to an extent.
3.9 Mathematical functions
3.10 File I/O
In an app, there always comes a point where you might want to persist some data. Persisting data in simple terms means retaining the data even after the app is exited. Some examples would include the current level, a high score, the player‘s name and so on. There could be other more complex examples where one might have levels stored in files. For all of these there’s an API, the File I/O API.
There are two ways to reference these functions, the explicit and the implicit. Explicit is when the file to be worked on is specified, it is seen in the form of file: type commands where as implicit is by passing the fileHandle to the function for file operations and are generally seen starting with io.
Example:
local playerName = "Awesome Player"
local file = io.open ( "settings.save" , "w+" )
file:write( "Playername:" , playerName )
file:close()
This has just saved a file called settings.save with the values "Playername: Awesome Player"
Now that we have some data saved in the file, let us try to read it from the file.
local playerName = nil
local file = io.open ( “settings.save”, “r” )
playerName = file:read()
file:close()
print ( “The playername saved is: ”, playerName)
3.10.1 Opening a file
To open a file using lua, we would use
file = io.open ( filename [, mode])
where the file called filename is opened and the file handle, a reference to this file is passed back in the variable file. The modes for opening the files can be one of the following.
- “r” read mode, this is the default mode
- “w” write mode
- “a” append mode
- “r+” update mode, all previous data is preserved
- “w+” update mode, all previous data is erased
- “a+” append update mode, previous data is preserved, writing is allowed only at the end of the file.
There is no explicit way to open a file, all files are opened using the io.open function.
3.10.2 Closing a file
To close a file, we would use
io.close([file])
This closes the file handle passed to the function, if nothing is passed, the default output file is closed.
The explicit way to close a file is file:close()
3.10.3 Getting data / Input
In a complex application, we need to get several kinds of data from files stored on the device. In order to get data from a file, we are given a couple of options, including lines and read.
When we use the lines function, it offers an iterator function, which returns a new line from the file each time it is called. Therefore this is used as
for line in io.lines(filename) do … end
Note that this function does not require the file to be opened or closed, all of that is managed by the function internally.
There is an explicit version of the same, which is used as file:lines(), the difference between this and the implicit function is that to get the filehandle, we have to open the file, there is no parameter passed to the lines function and when the end of file is reached, the file is not automatically closed, we have to close it.
The other way to get data from a file is the read function, which is used as
data = io.read( format1, … )
The explicit equivalent is file:read( format1, … )
Since the function does not have a filehandle passed to it, io.read reads from the standard input and hence if you want to read from a file,
The formats that can be used for the function are:
- “*n” this will read a number, this returns a numeric value than a string
- “*a” this will read all the data in the file, starting from the current position.
- “*l” this will read the next line, this is the default for this command
where nn if a number is used for format, it tells the function to read those many (nn) characters from the file.
3.10.4 Temporary files
Sometimes there might be the need to create a temporary file either to transfer portions of data or to save a backup copy before being certain. The easiest way to create one than trying to name the files through the code and then keeping track of the file open and close, etc is to use the io.tmpfile() function. This returns a file handle to a temporary file opened in update mode and this file is automatically removed when the app terminates.
3.10.5 Writing data
To write data back to the files, it has to be opened in a mode that supports writing data to the file. The one and only way to write data is to use the function write.
io.write(value1, …)
The data passed to the function is written to the file, however since there is no filehandle passed to this function, it writes to the standard output, so if you want to write to a file, the file:write(value1, ...) function should be used.
3.10.6 Seeking your position in the file
Updating data is one of the easiest and one of the most difficult task. An easy way to update data is overwrite the entire file with the new data, but sometimes that can be very time consuming so the easier way is to position the write head to the position and then write the data there. We can get the position and set the position by using the function seek, this is an explicit function only.
position = file:seek( [mode] [,offset] )
By default, the mode is set to “cur” and the offset to 0. There are three modes which are
“set” this is from the 0 position (start of file) and the head is moved to the position as specified by offset
“cur” this is from the current position, so the offset is added to the current position
“end” this is from the end of the file
so to get the size of the file, one can use
filesize = file:seek(“end”)
the set can be used to rewind the reading.
3.10.7 Buffering
The buffering for a file can be set by the file:setvbuf() command which is defined as
file:setvbuf( mode [, size] )
there are three modes that are available for this command:
- “no”: There is no buffering, the results are instantaneous
- “full”: The output operations occur only when the buffer is full, or when you flush
- “line”: The output is buffered on a per line basis (till a newline character is received)
The size is the size of the buffer in bytes.
3.10.8 Flushing data
If you are using a buffer for writes, you might want to flush i.e. commit the file’s output buffer and save all of that to the file. Buffering is not really required in modern systems but still can be helpful at times. So before closing a file, if buffering was on, it is a good practice to flush and ensure that all the data is saved from the buffers to the file. This is an explicit function so is defined as
file:flush()
there are no parameters passed to this function.
3.10.9 Validating the file operations
While working with files there are a lot of situations that could lead to errors, so it is very important to check for the return values, generally the return values are nil when the end of the file is reached or a file could not be opened, etc.
However to check the state of the file via the file handle can be with the type function as
result = io.type(fileHandle)
the return value is either “file” if the file is open, “closed” if the file is closed or nil if the fileHandle is not a file handle.
3.11 Lua resources
This guide is by no means complete, and we suggest you have a good book covering Lua. There are many resources on the net, and here are a few of them:
- Programming in Lua, second edition by Roberto Ierusalimschy (http://www.inf.puc-rio.br/~roberto/pil2/)
- Very nice Lua reference manual helper (http://pgl.yoyo.org/luai/i/_)
- Official Lua FAQ (http://www.lua.org/faq.html)
- Introduction to Lua programming (http://w3.linux-magazine.com/issue/45/Lua_Programming.pdf)
4. Classes in Gideros
Lua does not support classes the way languages like C++, Java and ActionScript do. But Lua is a multi-paradigm language and have roots from prototype-based languages. In Lua, each object can define its own behaviour through metatables. Therefore, it is possible to emulate OO programming and classes in Lua.
Note: For the detailed discussion of object oriented programming in Lua, please refer to http://www.lua.org/pil/16.html
|
Gideros follows the same paradigm in its API design. Each instance created by Gideros API is a Lua table with a metatable attached.
4.1 Creating instances
Instances in Gideros is created through new function. For example, to create a Sprite, Texture, Bitmap and a Timer instance:
local sprite = Sprite.new()
local texture = Texture.new("image.png")
local bitmap = Bitmap.new(texture)
local timer = Timer.new(1000, 0)
local texture = Texture.new("image.png")
local bitmap = Bitmap.new(texture)
local timer = Timer.new(1000, 0)
4.2 Inheritance
The Core.class function is used to create your own classes through inheritance (older versions of Gideros used the gideros.class function -- this function has now been deprecated). You can inherit from Gideros API's own classes (EventDispatcher, Sprite, etc.) or from your own classes. For example, you can create your own class that inherits from EventDispatcher class like so:
MyEventDispatcher = Core.class(EventDispatcher)
You can also create a new class by using Core.class with no arguments:
MyOwnClass = Core.class()
By using Inheritance, you can design and implement the visual elements of your game separately:
-- create your own start button class
StartButton = Core.class(Sprite)
-- create your own menu class
-- create your own menu class
Menu = Core.class(Sprite)
-- create your own player class
Player = Core.class(Sprite)
Player = Core.class(Sprite)
function Player:walk()
-- walk logic
end
function Player:jump()
-- jump logic
end
-- create and add a player instance to the stage
stage:addChild(Player.new())
When an instance is created, init function is called to do the initialization:
Player = Core.class(Sprite)
function Player:init()
-- do the initialization of Player instance
self.health = 100
self.speed = 3
end
-- after Player instance is created, init function is called
function Player:init()
-- do the initialization of Player instance
self.health = 100
self.speed = 3
end
-- after Player instance is created, init function is called
local player = Player.new()
Whether to use inheritance or not is related to your programming taste. It's possible to implement a whole game without creating custom classes. You can refer to "Jumping Ball" and "Jumping Balls" examples to see the difference between designing your code with classes or not.
Using classes makes it easier to reuse code.
4.2.1 Inheriting From Classes With Constructor Arguments
If you inherit from a class that takes a constructor argument, your new class has to pass in the arguments that the base class expects as its first arguments. You can then pass in any additional arguments:
MyBitmap = Core.class(Bitmap)
function MyBitmap:init(texture, additional args)
....
end
Here's a very simple example:
A = Core.class()
function A:init(msg1)
print("A:init("..msg1..")")
end
B = Core.class(A)
function B:init(msg1, msg2)
print("B:init("..msg1..","..msg2..")")
end
B.new("hello","world")
This example produces:
A:init(hello)
B:init(hello,world)
4.2.2 Adding Explicit Dependencies for Inherited Classes
You can put class definitions in different files, but if it doesn't work, it may be because the files are being loaded in the wrong order. You can specify file dependencies in the IDE. Select a file, right click, then select "Code Dependencies".
For example, if class A (in classA.lua) inherits from class B (in classB.lua) and you're getting a message like "attempt to index global 'B' (a nil value)" during the initialization process, select "classA.lua" and add a dependency on classB.lua.

4.2.3 Accessing Overridden Functions
If you inherit from a class and override one of its functions, you have to call the overridden function using syntax like "BaseClassName.function(self)". Here's an example:
-- --------------------------------------
A = Core.class()
function A:init(msg1)
self.text = "I'm an A"
end
function A:method()
print(self.text .. " in A:method()")
end
-- --------------------------------------
B = Core.class(A)
function B:init(msg1, msg2)
self.text = "I'm a B"
end
function B:method(arg1)
print(self.text .. " in B:method()")
--A:method() <--- not="" span="" this="">
A.method(self)
end
-- --------------------------------------
b = B.new("hello","world")
b:method()
This will produce:
I'm a B in B:method()
I'm a B in A:method()
If you try to use "A:method()" in "B:method()" you'll get an error about a nil value for the 'text' field. That's because you're using the "A" instance that was created in the "A = Core.class()" line (equivalent to "A.method(A)").
If you try to use "self:method()", you'll be recursively calling "B:method()"
5. Graphics and animation
5.1 Introduction to graphics
In Gideros Studio, all graphical content is constructed by creating graphical instances and adding them to the scene tree. For example, Bitmap class is used to display bitmap graphics, and TextField is used to display text object. Sprite class is used to group and transform these instances. The inheritance diagram of core display is shown in Figure xxx.
Sprite is the base class of all display classes and has no visual representation. It’s the main construction element and used to create display hierarchies. Sprites can have other sprites as their children and these children inherit properties such as position, scaling and transparency from their parent sprite. Hierarchy is an important feature in graphics - when you move your parent sprite, all the child (and grandchild) sprites also move simultaneously.
Here are some examples:
- Create a new Sprite instance:
local childSprite = Sprite.new()
- Add the new Sprite as a child:
mySprite:addChild(childSprite)
- Set the position:
mySprite:setPosition(10, 20)
- Set the scaling:
mySprite:setScale(0.5, 1)
- Set the rotation angle:
mySprite:setRotation(90)
- Set the alpha transparency:
mySprite:setAlpha(0.7)
- Get the first child:
mySprite:getChildAt(1)
- Remove the child:
mySprite:removeChild(childSprite)
Sprites can have only one parent. Therefore if you add a child object that already has a different sprite as a parent, the sprite is removed from the child list of the other sprite and then added to this sprite.
5.2 Stage
The scene tree is the hierarchy of all graphical objects currently displayed and this hierarchy needs a root. The root of the scene tree is an instance of the Stage class which is automatically created and set as a global variable when Gideros starts. You can access this global variable with the name stage.
When Gideros starts, the display list hierarchy contains one item (the global Stage instance) only and we can add more:
- Create a Sprite object
local mySprite = Sprite.new()
- Add this sprite to the stage:
stage:addChild(mySprite)
5.3 Textures and Bitmaps
Texture class is used to load an image file and holds the data stored in the image file. The Bitmap class inherits from Sprite and wraps a Texture object for on-screen display. By separating image display (Bitmap) from data (Texture), it’s possible to create many Bitmap objects simultaneously display the same Texture object each with its own display characteristics.
- Load a texture:
local texture = Texture.new("image.png")
- Load a texture with filtering:
local texture = Texture.new("image.png", true)
- Create a Bitmap object to display the texture
local bitmap = Bitmap.new(texture)
- Add the Bitmap object to the stage
stage:addChild(bitmap)
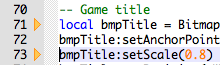
5.3.1 Anchor Point
Each Bitmap object has an anchor point that affects the positioning of the texture displayed. By modifying the anchor point, you change the origin of the texture. For example, setting the anchor point to (0.5, 0.5) moves the center of the texture to the origin. If you set the anchor point to (1, 1) instead, the bottom-right corner of the texture will be the origin. The default value of anchor point is (0, 0) which means top-left of the texture is the origin by default.
setAnchorPoint(0,0) setAnchorPoint(0.5, 0.5) setAnchorPoint(1,1)
In this example, we set the anchor point to (0.5, 0.5):
local bitmap = Bitmap.new(Texture.new("image.png"))
bitmap:setAnchorPoint(0.5, 0.5)
5.3.2 What is a Texture Atlas?
Texture atlas is a single large image which contains many smaller sub-images. Each sub-image contained in the texture atlas is defined with a rectangular area.
figure here
There are two main reasons of using a texture atlas instead of many independent textures:
1. Texture atlasses usually consume less memory.
To use an image as a texture, it’s width and height always have to be a power of two. Gideros automatically increase the texture size to conform this rule. For example, an image with dimensions of 100x200 becomes a texture with dimensions of 128x256 in memory. That’s where the texture atlas becomes handy. Texture atlases usually have a power-of-two dimensions and therefore doesn’t need to be enlarged.
2. Rendering from a texture atlas is usually faster.
Each texture is bound to OpenGL just before rendering it and binding is costly operation. Using texture atlases instead of individual textures helps in reducing bind operations
TextureRegion
The TextureRegion class specifies a texture and a rectangular region in it. It is used to define independent texture regions within a texture atlas which is a large image, which contains many smaller sub-images. Displaying the texture regions is same with displaying textures: Create a Bitmap object that wraps the TextureRegion object:
- Load a texture:
local texture = Texture.new("image.png")
- Create a texture region as top left point is (30, 40) with dimensions (100, 50):
local textureRegion = TextureRegion.new(texture, 30, 40, 100, 50)
- Create a Bitmap object to display the texture region:
local bitmap = Bitmap.new(textureRegion)
TexturePack
TexturePack class is used to create and load texture atlases. You can either create your texture atlas dynamically in your game, or use a pre-packed texture atlas. After creation of your texture pack, you can get a region of it as a TextureRegion object by using getTextureRegion function. These features are described below in more detailed.
Dynamic Creation of Texture Packs
To create a texture pack dynamically (at run-time), create TexturePack object with an array of file names of textures:
local texturePack = TexturePack.new({"1.png", "2.png", "3.png", "4.png"})
Gideros loads and packs these images fast and gives you a ready to use texture pack. After creating your texture pack, you can display it easily since it's also a texture in itself:
local bitmap = Bitmap.new(texturePack)
stage:addChild(bitmap)
Note: Gideros uses an algorithm called MaxRects to pack the textures. This algorithm is considered as one of the best packing algorithms in terms of speed and efficiency. If you are interested, you can find the details of MaxRects algorithm at http://clb.demon.fi/projects/even-more-rectangle-bin-packing
|
Pre-packed Texture Packs
Another option to create texture packs is to use an external texture packer tool. Gideros Texture Packer, which comes with the installation package can be used to create texture packs.
Getting Texture Regions from Texture Packs
To get the texture region from the texture pack, you need to call the name of the image.
local texturePack = TexturePack.new({"1.png", "2.png", "3.png", "4.png"})
local textureRegion = texturePack:getTextureRegion(“1.png”)
5.4 Automatic image resolution
With the introduction of iPad, iPhone 4 and variety of devices running Android, now there are multiple resolutions that game developers should consider. To efficiently use texture memory and processing power of GPUs, applications should use low-resolution images on devices with low-resolution screens and high-resolution images on devices with high-resolution screens. With the help of automatic image resolution, you can bundle both low and high resolution images together with your application and Gideros automatically selects the best resolution according to your scaling.
Automatic image resolution is directly related to automatic screen scaling. For example, if your screen is automatically scaled by 2, then using the double-sized image is the best choice in terms of quality and efficiency.
Open the project “Hardware/Automatic Image Resolution” to see automatic image resolution in action. Run this example multiple times by selecting different resolutions on Gideros Player such as 320x480, 640x960 and 480x800. As you can see, for the different resolutions, the original 200x200 image or high-resolution variants (300x300 and 400x400) are selected and displayed automatically.
Now right click on the project name and select “Properties…” to understand how we configure automatic image resolution parameters:
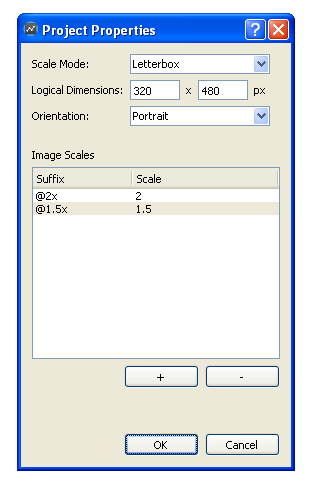
In this example, our logical dimensions are 320x480 and scale mode is Letterbox. So the scaling factor for a device with screen resolution 320x480 (older iPhones) is 1, scaling factor for 480x960 (iPhone 4) is 2 and scaling factor for 480x800 (Samsung Galaxy S) is around 1.5.
As you can see, we’ve configured image scales as:

So if you have a base image with resolution 200x200 with name “image.png”, you provide these 3 images:
- image.png (200x200)
- image@1.5x.png (300x300)
- image@2x.png (400x400)
and let Gideros pick the appropriate one.
Providing the alternative images (in our example, these are image@1.5x.png and image@2x.png) is optional but you should always provide the base image (image.png). When Gideros cannot find the alternative image to load, it loads the base image. Also size calculations are done according to the size of the base image.
Design for High Resolution Devices
In our example, we set the logical dimensions as 320x480 and provide higher-resolution alternative images. On the other hand, it’s possible to set logical dimensions as 480x960 or 768x1024 and provide lower-resolution images. In this case, we can configure the image scales like:
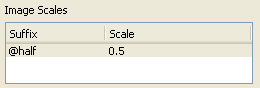
and provide alternative images with suffix “@half” as half-resolution of the original ones.
5.5 Automatic screen scaling
5.6 Creating game flow and logic
5.7 Scene management
Most applications and games have different scenes (e.g., menu, scoreboard, game levels, inventory, end-of-game, etc). A transition from one scene to another is usually started by user input or some other event. These transitions typically consist of the following steps:
- Construct the new scene (e.g., load bitmaps, sprites, sounds)
- Hide the original scene and show the new scene, often with some kind of special effect (e.g., crossfading)
- Destroy the old scene
High level scene management functions aren’t provided directly in Gideros but the Gideros team has released a “Scene Manager” library (see: https://github.com/gideros/Scene-Manager) that can be used as is or that can be modified and extended to by the user (it’s licensed under the liberal MIT license). The library includes a demonstration Gideros project that shows many of the available built-in transitions (a demonstration video can be found on YouTube: http://www.youtube.com/watch?feature=player_embedded&v=KQMSHOMInQU).
5.7.1 Scene Manager Usage Overview
Create a class for each of your scenes (and preferably put them into separate .lua files):
Menu = gideros.class(Sprite)
Game = gideros.class(Sprite)
EndScene = gideros.class(Sprite)
Create a SceneManager instance passing a table with scene names as keys and your classes as values:
local sceneManager = SceneManager.new{
["menu"] = Menu,
["game"] = Game,
["endScene"] = EndScene,
}
stage:addChild(sceneManager)
Change between scenes with function SceneManager:changeScene(sceneName, duration, transition, ease) like so:
sceneManager:changeScene("game", 1,
SceneManager.moveFromTop, easing.linear)
SceneManager dispatches events as it makes the transition from one scene to another (enterBegin, enterEnd, exitBegin, exitEnd). You can register to listen for these events to begin/end your animations, clear your timers, save the scores, etc.
5.7.2 Built-in Transition Effects
The scene manager library defines the following transition effects:
Move functions
- SceneManager.moveFromLeft
- SceneManager.moveFromRight
- SceneManager.moveFromBottom
- SceneManager.moveFromTop
- SceneManager.moveFromLeftWithFade
- SceneManager.moveFromRightWithFade
- SceneManager.moveFromBottomWithFade
- SceneManager.moveFromTopWithFade
Overlay functions
- SceneManager.overFromLeft
- SceneManager.overFromRight
- SceneManager.overFromBottom
- SceneManager.overFromTop
- SceneManager.overFromLeftWithFade
- SceneManager.overFromRightWithFade
- SceneManager.overFromBottomWithFade
- SceneManager.overFromTopWithFade
Fade & flip functions
- SceneManager.fade
- SceneManager.crossFade
- SceneManager.flip
- SceneManager.flipWithFade
- SceneManager.flipWithShade
5.7.3 Transition Events
The scene manager dispatches the following four events:
- enterBegin: Dispatched when your new scene is about to enter the stage. You can initialize your variables here.
- enterEnd: Dispatched after the transition of new scene has ended. Mostly, you add listeners and start your logic here.
- exitBegin: Dispatched when your current scene is about to leave the stage. You can remove listeners and stop timers here.
- exitEnd: Dispatched after your current scene has leaved the stage.
The following code shows an example scene (“MyScene”) and how you might use the “enterEnd” and “exitBegin” events:
MyScene = gideros.class(Sprite)
function MyScene:init()
self:addEventListener("enterEnd", self.onEnterEnd, self)
self:addEventListener("exitBegin", self.onExitBegin, self)
end
function MyScene:onEnterEnd()
self:addEventListener(Event.ENTER_FRAME, self.onEnterFrame, self)
-- create your timers
-- also you can add your player sprite
-- and so on...
end
function MyScene:onExitBegin()
self:removeEventListener(Event.ENTER_FRAME, self.onEnterFrame, self)
-- stop your timers
-- save score
-- and so on...
end
5.8 Fonts
Gideros supports for both bitmap fonts (also known as BMFonts) and TrueType Fonts. Font and TTFont classes are used to load fonts and TextField class is used to create display objects for text display.
5.8.1 Bitmap Fonts
A bitmap font consists of an image that contains all the glyphs, and a descriptor file that defines the properties and bounds for each glyph. Also font descriptor file can contain kerning information between each glyph.
You need to use an external tool to create bitmap fonts. Gideros Font Creator is one of these and you can find it inside the installation directory. Other noticeable bitmap font creator tools are:
- BMFont from AngelCode (windows only) http://www.angelcode.com/products/bmfont/
- Glyph Designer (mac only) http://www.71squared.com/glyphdesigner
- Hiero (java, multiplatform) http://slick.cokeandcode.com/demos/hiero.jnlp
Usually these tools have the ability to enhance the bitmap fonts with effects like shadows, outlines, color gradients, and so on. And this is the main advantage of using bitmap fonts.
After creating the image (e.g. font.png) and the descriptor file (e.g. font.txt or font.fnt), you can load the bitmap font as:
local font = Font.new("font.txt", "font.png")
And after loading the font, you can create a TextField object to display a text as:
local textField = TextField.new(font, "Hello World")
Finally you can add the resulting TextField object to the stage to display it:
stage:addChild(textField)
TextField inherits from Sprite class and therefore has all the properties and capabilities of sprites.
Bitmap fonts are fast to render and fast to update. But they should be created with a tool beforehand and therefore the size of any bitmap font is fixed. Also you need to create separate bitmap fonts for each automatic image resolution suffix (e.g. @2x, @4x, etc.) and Gideros automatically selects the best bitmap font according to your scaling.
5.8.2 TrueType Fonts
Gideros also can load and use .ttf (TrueType font) files directly:
local font = TTFont.new("arial.ttf", 20)
local text = TextField.new(font, "Hello world")
text:setPosition(10, 20)
stage:addChild(text)
Here the first parameter is the font file and second parameter is the size.
While using TrueType fonts, whenever a text is created or updated, the given TrueType font is used to render the text on a texture and unfortunately it's a slow operation. This is the main disadvantage of using TrueType fonts but can be avoided with caching.
5.8.3 TrueType Fonts with Caching
It's possible to cache TrueType font glyphs into an internal texture so that updating the font text won't be a slow operation anymore. For example, to create a TrueType font with all uppercase characters:
local font = TTFont.new("arial.ttf", 20,
" ABCDEFGHIJKLMNOPQRSTUVWXYZ")
local text = TextField.new(font, "HELLO WORLD")
text:setPosition(10, 20)
stage:addChild(text)
Note: If a character is not found in the internal cache, it simply won't be displayed.
5.8.4 Font Metrics
In Gideros, TextField object are positioned according to their baselines:

The ascender of a font is the distance from the baseline to the highest position characters extend to. So that...
local font = TTFont.new("arial.ttf", 20)
local text = TextField.new(font, "Hello world")
text:setY(font:getAscender())
stage:addChild(text)
Talk about kerning, advance and widths.. TO BE WRITTEN MORE....
5.9 Drawing sprites
5.10 Using textures
5.11 Shapes
Gideros provides a Shape class for drawing primitive shapes. It is similar to the drawing API found in Flash although at the moment it only has a subset of Flash’s capabilities. Since the Shape class inherits from Sprite (which itself inherits from EventListener), instances of the shape class can be rotated, scaled, positioned on the screen, listen for and dispatch events - basically anything that Sprites can do. See the chapter on Sprites for a full list of inherited capabilities.
The unique functions added by the Shape class are:
Function Name
|
Description
|
Shape.new()
|
Creates a new Shape object
|
Shape:setFillStyle(type, …)
|
Sets the fill style for a shape
|
Shape:setLineStyle(width, color, alpha)
|
Sets the line style for a shape
|
Shape:beginPath(winding)
|
Begins a path
|
Shape:endPath()
|
Ends a path
|
Shape:moveTo(x,y)
|
Moves the pen to a new location
|
Shape:lineTo(x,y)
|
Draws a line from the current location to the specified point
|
Shape:closePath()
|
Draws a line from the current location to the first point in the path
|
Shape:clear()
|
Clears all paths from the shape and resets the line and fill style to default values
|
One question that you might ask is: Why draw using this primitive API? Wouldn’t it be better to use some other authoring environment (e.g., Photoshop, Inkscape, Gimp) then import the image as a Texture? In most cases, an authoring tool is the right answer. However, there are cases where you don’t know which graphics you need in advance:
- Drawing tool (e.g., drawing lines based on user input)
- Graphs (e.g., stock prices, bar-charts)
- Graphics equalizer in a music player
- Skinning physics engine soft bodies
5.11.1 Gideros coordinate system
The standard cartesian coordinate system that everyone learns in school consists of an origin point (x=0, y=0) which is often drawn in center of the page. The x values increase to the right horizontally and the y values increase upwards vertically (i.e., x values are negative to the left of the origin and positive to the right, y values are negative below the origin and positive above).
The origin point in the Gideros coordinate system is in the upper left hand corner of the screen with an inverted y axis (i.e., y values are negative above the origin and positive below the origin). The x axis is the same as the standard cartesian coordinate system. {ISSUE: Current origin point in gideros desktop player seems to be 1,0 -- posted issue on gideros forum}

5.11.2 Usage overview
Shapes consist of zero or more paths. Each path consists of zero or more lines with the same line and fill style. A different line or fill style can be used for each path. Since a path can only have one line style and one fill style, multiple paths are required to use different line / fill styles within a shape.
A pen & paper analogy is often used to describe the drawing approach used by the Shape class. The “moveTo” function can be thought of as lifting a pen off the paper and moving it to a different location without drawing anything. The “lineTo” function draws a straight line from current pen location to the destination location.
The overall flow for drawing with the Shape class is:
- Create a new shape
- For each path that you want to draw;
- Begin the path
- Set the fill style (fill or line must be set for the shape to be visible)
- Set the line style (fill or line must be set for the shape to be visible)
- Move pen and draw lines
- Close the path (optional)
- End the path
5.11.3 Drawing your first line
Our first drawing will be a simple horizontal line from x=100,y=100 to x=200,y=100 as shown in the following figure. We’ll use the moveTo function to move to the first point, then the lineTo function to actually draw the line.
Here’s the code to draw the line:
local shape = Shape.new() -- create the shape
shape:beginPath() -- begin a path
shape:setLineStyle(1) -- set the line width = 1
shape:moveTo(100,100) -- move pen to start of line
shape:lineTo(200,100) -- draw line
shape:endPath() -- end the path
stage:addChild(shape) -- add the shape to the stage
Some things to note about this code:
- Without the call to setLineStyle, the line wouldn’t have been visible -- in this example, we used setLineStyle to set the line width to 1 (the default line color is black)
- We added the shape directly to the stage. For this example that’s good enough. For more complicated examples you’d probably use some other parent. Most of the the following Shape examples will use this same approach.
5.11.4 Drawing a Rectangle
Lines aren’t very interesting so lets expand our line into a filled rectangle. We’ll draw the rectangle with the upper left corner at 100,100 and the lower right corner at 200,200. We’ll also fill the rectangle with a boring gray color.
local shape = Shape.new() -- create the shape
shape:beginPath() -- begin a path
shape:setLineStyle(1) -- set the line width = 1
shape:setFillStyle(Shape.SOLID, 0xcccccc) -- NEW: boring gray
shape:moveTo(100,100) -- move pen to start of line
shape:lineTo(200,100) -- draw top of rectangle
shape:lineTo(200,200) -- NEW: draw right side of rectangle
shape:lineTo(100,200) -- NEW: draw bottom of rectangle
shape:lineTo(100,100) -- NEW: draw left side of triangle
shape:endPath() -- end the path
stage:addChild(shape) -- add the shape to the stage
This example is similar to our line drawing program plus 1 additional line to fill the rectangle and 3 additional new lines to draw the right, bottom, and left sides of the rectangle.
5.11.5 Drawing Arbitrary Polygons
There are a couple of simplifications that we can make to the rectangle code:
- The call to moveTo can be replaced with lineTo. The first call to lineTo after a path is started behaves just like a moveTo.
- Although a rectangle has 4 points, we have to use a total of 5 moveTo/lineTo calls -- the first point has to be used twice (once for the initial moveTo command and once to close the rectangle with the final lineTo call). The last lineTo command can be replaced with a call to closePath. The closePath function is equivalent to a lineTo command to the first point in a path.
The following code uses these two simplifications to draw a polygon from an arbitrary list of data points:
local path = { {100,100}, {200,100}, {200,200}, {100,200} }
local shape = Shape.new()
shape:setLineStyle(1)
shape:setFillStyle(Shape.SOLID, 0xcccccc)
shape:beginPath()
for i,p in ipairs(path) do
shape:lineTo(p[1], p[2]) -- lineTo used for all points
end
shape:closePath() -- connect last point to first point
shape:endPath()
We can change path to have as many points as we’d like and the above code will draw the closed polygon.
path = { {x1,y1}, {x2,y2}, … add as many points as you want … }
5.11.7 Shape Anchor Point
Shapes are “anchored” at the graph origin (0,0). The anchor point affects how the shape behaves when manipulated (e.g., rotated, scaled). If we were to rotate the rectangle we drew earlier by 90%, the rectangle would have rotated off the screen since it would have rotated about the (0,0) origin point. The anchor point also affects scaling -- scaling the rectangle would have moved it further away from (0,0) if it was enlarged and closer to (0,0) if we’d scaled it down.
Let’s change our previous polygon example so that the rectangle will stay centered at it’s center point (150,150) if rotated or scaled. The code will need the following two changes:
- Draw the rectangle centered at (0,0)
- Use the inherited Sprite:setPosition function to position the shape
We can make these changes by modifying the first few lines of our previous example like so:
local path = { {-50,-50}, {50,-50}, {50,50}, {-50,50} }
-- CHANGED: points are now centered around (0,0)
local shape = Shape.new()
shape:setPosition(150,150) -- NEW
-- ... the rest of the original example would go here …
5.11.6 Line and Fill Styles
We’ve used setLineStyle and setFillStyle in our examples, but the lines and rectangles that we’ve drawn so far are pretty boring. This section provides more details on these two functions.
The setLineStyle function has one required parameter (width) and two optional parameters (color, alpha):
width: width of the line (integer number > 0)
color: color value of the line (optional hexadecimal number, default = 0x000000)
(red is 0xFF0000, blue=0x0000FF, green=0x00FF00, white=0xFFFFFF, etc.)
alpha: alpha value for the line (optional floating point value between 0 & 1, default=1)
(0 = invisible, 0.5 = 50% transparency, 1 = no transparency)
The following figure shows some example line styles.
Shapes can be unfilled, filled with a color, or filled with a texture. The first argument to setFillStyle determines the fill type:
- Shape.NONE: Clears the fill style (i.e., the shape will not be filled)
- Shape.SOLID: Sets the fill style as a solid color. In this mode, an additional color parameter is required (hexadecimal number). An optional alpha value (floating point number between 0 and 1) can also be specified.
- Shape.TEXTURE: Fills the shape with a tiled texture. In this mode, and additional texture argument is required. An optional transformation matrix can also be specified.
The following illustrates how to use the three different types of fill styles:
setFillStyle(Shape.NONE) -- unfilled
setFillStyle(Shape.SOLID, 0xff0000) -- fill solid red color
setFillStyle(Shape.SOLID, 0xff0000, 0.5) -- fill with red,
-- 50% transparency
local texture = Texture.new("image.png")
setFillStyle(Shape.TEXTURE, texture) -- fill with texture
local matrix = Matrix.new(0.5, 0, 0, 0.5, 0, 0)
setFillStyle(Shape.TEXTURE,texture,matrix -- fill with texture
-- scale x/y by 0.5
There are two important things to note when using texture fills:
- If the shape of the texture is smaller than the area to be filled, Gideros will tile the textures in both the x and y dimensions. The tiles will be aligned so that the upper left hand corner of the texture will be at x=0, y=0 (unless this is modified by a transformation matrix).
- If the width and/or height of the texture is not a power of 2, Gideros will increase the width/height to be a power of 2 with the expanded area left unfilled or transparent. For example, a 33 (width) x 123 (height) texture will be re-sized to 64 x 128 then tiled as necessary.
As stated previously, all lines and drawn shapes within a path share the same line and fill style. Gideros applies the most recently specified line and fill style when each path is ended (i.e., with endPath). The following code draws a shape with 2 paths. Everything drawn between a beginPath/endPath pair will have the same line and fill style. In other words, even though setLineStyle is called 5 different times, only 2 of them have an effect because there are only 2 paths.
local s = Shape.new()
s:setLineStyle(1)
s:beginPath()
s:moveTo(10,10); s:lineTo(20,10) -- line width will be 1
s:endPath()
-- All lines in the following path will have a width of 3.
-- Only the setLineStyle call right before endPath has an effect
s:beginPath()
s:setLineStyle(1)
s:moveTo(10,10); s:lineTo(20,10) -- line width will be 3
s:setLineStyle(2)
s:moveTo(10,10); s:lineTo(20,10) -- line width will be 3
s:setLineStyle(3)
s:endPath()
s:setLineStyle(4)
5.11.8 Winding Rules
Simple paths such as circles, triangles, rectangles have a well-defined and obvious “fill area.” For complex paths (e.g., concentric circles, shapes with intersecting lines), multiple choices can be made as to whether fill an area. The Shape:beginPath function takes an optional winding argument that determines how the path will be filled (the default value for the argument is Shape.EVEN_ODD). To determine whether an area should be filled, the following two rules are available within Gideros:
- Even odd rule (Shape.EVEN_ODD)
- Draw a line with a start point in the area to be filled extending to infinity in any direction
- If the line crosses an even number of lines, the area should NOT be filled
- If the line crosses an odd number of lines, the area should be filled
- Non-zero rule (Shape.NON_ZERO) - this rule depends on the drawing direction (or winding) of the edges of the path. When paths of opposite drawing direction intersect, the area will be unfilled.
- Draw a line with a start point in the area to be filled extending to infinity in any direction
- Start with a count of 0
- Every time the line crosses a line of the polygon drawn in one direction add one to the count. Subtract one from the count for every edge drawn in the opposite dimension.
- If the ending count is zero, the area should NOT be filled. If the ending count is zero, the area should be filled.
For example, consider a simple path such as a rectangle: a line started from “outside” the rectangle will either cross 0 edges or 2 edges. Since the line crosses an even number of lines, the area should not be filled using the even odd rule. The area wouldn’t be filled with the non-zero rule either: the line would either cross 0 edges (count would be 0) or two edges -- one edge drawn in one direction, the other edge drawn in the opposite direction (the count would be 0). If a line is started inside the rectangle, the line will intersect one edge (an odd count for the even odd rule, and a count of either -1 or 1 for the non zero rule).
In can be confusing to decide whether an area should be filled but thankfully examples of different winding rules are easy to find since these two winding rules are used in flash, svg, postscript, and many other drawing technologies.
5.12 Using tilemaps
5.13 Optimization and memory management
5.14 Timelined animations with Movieclip
Note: Currently there’s no way to set the animation speed, however you can prepare different animations for different speeds like:
local eliAnim = MovieClip.new{
{1, 7, self.anim[1]},
{8, 15, self.anim[2]},
{16, 18, self.anim[1]},
{19, 21, self.anim[2]},
}
eliAnim:setGotoAction(15, 1) --> frames 1-15: slow animation
eliAnim:setGotoAction(21, 16) --> frames 16-21: fast animation
eliAnim:gotoAndPlay(1) --> play slow animation
eliAnim:gotoAndPlay(16) --> play fast animation
This way, you can position your MovieClip wherever you want (e.g running player, walking player, flying helicopter, etc).
Немає коментарів:
Дописати коментар